Transform any space from flat and functional to dynamic and inviting with a proven 5-layer lighting framework—room by room, step by step.
Gone are the days of relying on a single overhead light to illuminate an entire room. True lighting design is an art form that, when executed with intention, transforms how we experience our homes. This master plan moves beyond basic illumination to reveal a systematic approach for layering five distinct types of light—ambient, task, accent, decorative, and dynamic—across every room in your residence. Whether you’re building new, renovating, or simply refreshing your current setup, you’ll discover actionable strategies to eliminate shadows, enhance functionality, reduce eye strain, and cultivate atmospheres that adapt to your daily rhythms and seasonal shifts. No prior expertise required; just a willingness to see your home in a new light.
Introduction
Lighting is the silent architect of ambiance. It influences mood, perception of space, and even our circadian rhythms, yet it remains one of the most overlooked elements in residential design. Too often, lighting plans are an afterthought, resulting in rooms that feel either starkly utilitarian or dimly uninviting. The consequences extend beyond aesthetics: inadequate task lighting in a kitchen may contribute to accidents; poorly placed bedroom lights can disrupt sleep patterns; and a lack of layered lighting in living areas can make social gatherings feel flat.
This guide synthesizes foundational principles established by lighting authorities such as the Illuminating Engineering Society (IES), adapted thoughtfully for residential contexts. We translate these professional standards into a clear, actionable framework designed specifically for homeowners. By embracing a layered approach, you move beyond the limitations of single-source lighting to create environments that are not only beautiful but also deeply functional. This isn’t about following fleeting trends; it’s about implementing adaptable strategies that respond to human needs, architectural character, and the natural rhythms of daylight throughout the year. As you progress through this guide, you’ll gain the confidence to make intentional choices—whether selecting a new fixture, rearranging existing lamps, or planning a full-scale renovation.
The Five-Layer Lighting Framework: Your Blueprint for Illuminated Living
At the heart of transformative lighting design lies a simple yet powerful concept: no single light source should bear the entire burden of illuminating a room. Instead, think of lighting as a symphony, where each instrument (or layer) plays a distinct role, and harmony emerges from their collaboration. This framework—comprising Ambient, Task, Accent, Decorative, and Dynamic layers—provides a repeatable system applicable to any room, style, or constraint. Mastering these five layers allows you to sculpt light with precision, ensuring every corner of your home serves its purpose while evoking the desired emotional response across seasons and occasions.
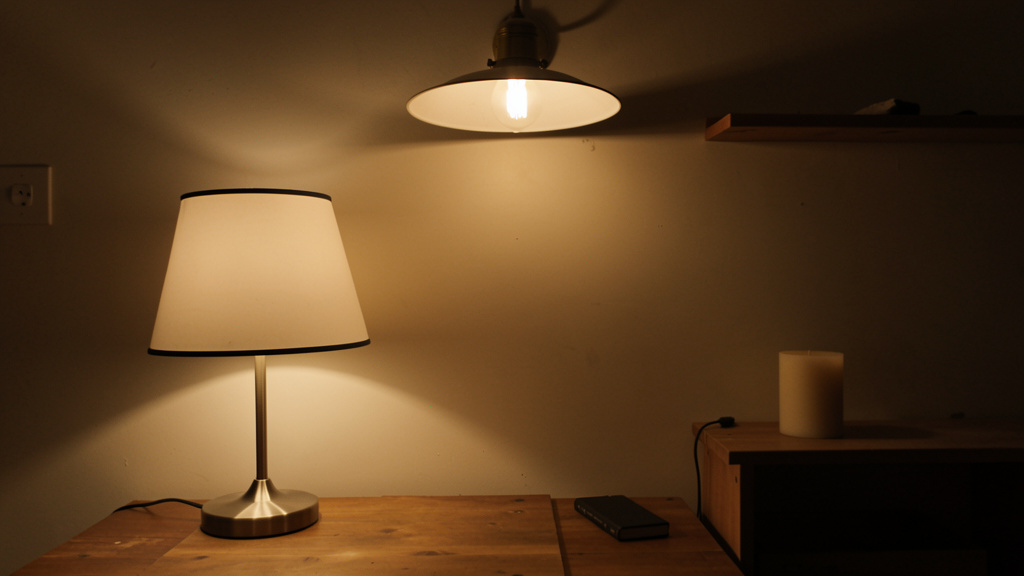
Layer 1: Ambient Lighting – The Foundation of Comfort
Ambient lighting, often called general lighting, establishes the baseline illumination level for a room. It softens shadows, reduces contrast between surfaces, and creates a sense of spaciousness. Without adequate ambient light, other layers struggle to perform effectively, potentially leading to visual discomfort.
Why this layer is essential: Ambient light sets the stage for all other activities. In a room with insufficient ambient lighting, eyes may strain adjusting between bright task areas and dark voids—a phenomenon sometimes described as visual fatigue. Conversely, overly bright ambient light can create glare and wash out textures. The goal is balanced, diffuse illumination that feels natural. Consider a living room illuminated only by a single ceiling fixture: faces appear shadowed during conversation, artwork fades into darkness, and the space feels cavernous. Proper ambient lighting eliminates these issues by providing gentle, even coverage that allows other layers to shine.
How to implement it thoughtfully:
– Ceiling-mounted solutions: Recessed downlights (placed strategically to avoid a uniform grid effect), semi-flush mounts, or cove lighting that bounces light off the ceiling for a soft glow. For cove lighting, install LED tape within a recessed channel at the ceiling-wall junction, directing light upward to reflect diffusely.
– Wall-mounted options: Sconces with upward-facing shades distribute light gently across walls and ceilings, reducing harsh shadows. Position them consistently along hallways or flanking seating areas.
– Natural light integration: During daytime, sheer curtains or strategically placed mirrors can amplify ambient light from windows. A large mirror opposite a window helps distribute available daylight more evenly.
– Practical guidance: Aim for moderate ambient levels as a starting point, adjusting based on room function, personal comfort, and time of day. Dimmers are highly recommended—they transform static lighting into adaptable ambiance. For context, many designers suggest beginning with approximately 20–30 lumens per square foot for living areas, but always prioritize how the space feels over rigid calculations.
Common considerations:
– Avoiding uniformity: Installing recessed lights in a rigid grid can create a cold, institutional feel. Instead, stagger placements and vary beam angles based on room layout and usage zones.
– Respecting proportions: In rooms with lower ceilings, choose shallow-profile fixtures to maintain visual balance. For higher ceilings, multiple smaller fixtures often feel more human-scaled than one massive centerpiece.
– Control matters: Hardwired ambient lights without dimming capability limit flexibility. Specify dimmable LEDs and compatible dimmer switches. Test dimmer compatibility before final installation—some combinations may produce unwanted effects like flickering or buzzing.
Adaptable approaches:
– Budget-conscious: Use multiple floor lamps with warm-white bulbs positioned around the room’s perimeter. An arc lamp near seating can cast wide, gentle light. For renters, plug-in wall sconces or smart bulbs in existing fixtures offer dimming without permanent changes. Position lamps to bounce light off walls for indirect ambient glow.
– Seasonal note: In winter months with shorter days, ambient lighting becomes more critical earlier in the evening. Consider warmer color temperatures (2700K) to complement the cozy atmosphere of colder seasons.
The Fundamental Principle: Ambient lighting should feel supportive—present enough to navigate safely, yet subtle enough that you notice the room, not the light source.
Layer 2: Task Lighting – Precision Where It Matters Most
Task lighting delivers focused illumination to specific areas where activities occur: chopping vegetables, applying makeup, reading, or working at a desk. This layer supports visual clarity, enhances comfort during detailed work, and contributes to a safer environment by highlighting exactly where light is needed.
Why precision matters: The human eye typically requires higher light levels for detailed tasks compared to general ambient levels. Without dedicated task lighting, people may instinctively lean toward available light sources, potentially causing neck strain or reducing accuracy. In kitchens, thoughtful task lighting over countertops supports safer food preparation; in home offices, well-placed desk lighting can reduce visual fatigue during screen work. Research suggests that appropriate task lighting may help minimize errors and support comfort during precision activities—a meaningful consideration for daily well-being.
Implementation strategies by zone:
– Kitchen work surfaces: Under-cabinet LED tape lights or puck lights help eliminate shadows cast by your body. Position them toward the front edge of the cabinet to light the entire countertop. For islands, pendant lights hung at a comfortable height above the surface provide direct downward light. In L-shaped kitchens, ensure corner zones receive overlapping light coverage.
– Bathroom vanities: Vertical sconces flanking the mirror (positioned near eye level) help prevent facial shadows—often more effective than overhead lights alone. Choose fixtures with a high Color Rendering Index (CRI >90) to support accurate color perception for grooming. For double vanities, independent controls for each side accommodate different preferences.
– Reading nooks and desks: Adjustable-arm floor lamps or swing-arm wall lamps allow personalized beam direction. Look for fixtures with built-in diffusers to soften the light source and reduce glare on screens or pages. Position desk lamps on the opposite side of your dominant hand to minimize hand shadows.
– Crafting or hobby areas: Magnifying lamps with integrated LEDs combine task lighting with visual aid. Position lights to illuminate your work surface without casting shadows from hands or tools.
Key considerations:
– Color temperature: Task lights often benefit from neutral temperatures (3000K–4000K) for clarity, but avoid very cool temperatures in living spaces to maintain a welcoming feel. In home offices, tunable-white lamps that shift from neutral (daytime focus) to warm (evening relaxation) can support natural circadian patterns.
– Beam control: Narrow spots suit highly focused tasks; wider floods work well for general desk areas. Adjustable fixtures offer maximum versatility.
– Flicker awareness: For lights used near screens, verify product specifications mention “flicker-free” operation. While often imperceptible, flicker can contribute to eye strain over time.
Practical refinements:
– Pendant height: Over kitchen islands, lights hung too high provide weak illumination; too low, they may obstruct sightlines. A common starting point is 30–36 inches above the surface, adjusted for user height and ceiling scale.
– Surface reflectance: Darker countertops absorb more light. Compensate with slightly brighter task fixtures or consider lighter surface materials where possible.
– Zone mapping: A home office may need task lighting not only for the desk but also for bookshelves or filing areas. Map all activity zones before finalizing your plan.
Adaptable solutions:
– Ideal: Hardwired, dimmable under-cabinet lighting with separate controls from ambient lights.
– Budget: Plug-in LED strip kits with adhesive backing (ensure they include a diffuser cover). Battery-operated puck lights work well for interior cabinet lighting.
– Renter-friendly: Clamp-on desk lamps or removable adhesive-backed LED strips. Many modern options are designed for easy removal without residue.
Layer 3: Accent Lighting – Sculpting Dimension and Drama
Accent lighting draws attention to architectural features, artwork, collections, or textured surfaces. It adds depth, creates focal points, and transforms flat walls into dynamic canvases. This layer operates on the principle of contrast: by highlighting select elements, you guide the eye and imbue a room with personality.
The psychology of accent: Humans are naturally drawn to contrast and variation. A well-placed accent light can elevate a modest piece of art or emphasize the grain of a wood beam. Consider a blank wall transformed by grazing light that reveals the subtle texture of plaster, or a bookshelf where individual volumes become curated objects under focused beams. Accent lighting answers the unspoken question: “Where should I look?”
Techniques and tools:
– Wall washing: Using multiple adjustable lights or track heads to evenly graze a wall, enhancing texture (e.g., stone, brick, or grasscloth wallpaper). Fixtures are typically placed 1.5 to 2 feet from the wall, aimed downward at a gentle angle. Space fixtures consistently along the wall length for balanced coverage.
– Grazing: Positioning lights very close to a textured surface to exaggerate shadows and highlights, revealing intricate details. Ideal for highlighting fireplaces or dimensional wall panels.
– Picture lighting: Slim LED picture lights mounted above frames provide focused illumination. Alternatively, adjustable track spots aimed at artwork from an angle can prevent glare on glass. For larger pieces, two fixtures angled inward often eliminate shadows more effectively.
– Indirect accents: Cove lighting beneath shelves or within media consoles creates a floating effect, ideal for highlighting displayed objects or reducing screen glare.
Proportional guidance:
– Accent lights are often brighter than ambient light in their immediate area to create effective contrast. Smartphone light meter apps can offer a general sense of ratios, though dedicated meters provide greater accuracy.
– For artwork, position lights so the beam center aligns with the vertical midpoint of the piece. Mount fixtures approximately 12–18 inches above the frame’s top edge.
– Maintain visual hierarchy: limit focal points to 1–3 per room. Too many highlighted elements can create visual competition.
Common refinements:
– Beam quality: Non-adjustable recessed lights aimed directly at art may create harsh hotspots. Choose adjustable trims with smooth beam edges for more refined results.
– Scale awareness: Match fixture scale to the object—mini-spots for small art, standard spots for medium pieces.
– Temperature harmony: Accent lights generally align with the ambient/task temperature in the room (typically 2700K–3000K) unless creating intentional artistic contrast. Consistency supports visual comfort.
Creative applications beyond art:
– Illuminate bookshelf contents with low-voltage strip lights on each shelf, positioned toward the front edge.
– Graze a textured accent wall behind a bed or sofa. For reclaimed wood, a shallow grazing angle reveals natural grain.
– Highlight kitchen open shelving to display dishware as decor. Warm LED strips make ceramic collections glow invitingly.
– Note: In-floor uplights or recessed well lights for dramatic effects typically require professional installation and careful planning for safety and maintenance access.
Accessible entry points:
– Beginner: A single adjustable track light aimed at a favorite painting. Start with one focal point to learn beam control.
– Intermediate: LED tape inside a media console for bias lighting behind the TV—this can reduce eye strain during viewing by softening the contrast between screen and dark room.
– Advanced: Integrated systems that activate accent lighting based on time of day or occupancy, often part of broader smart home setups.
Layer 4: Decorative Lighting – Where Form Meets Function
Decorative lighting fixtures serve dual purposes: they emit light while acting as sculptural elements that express style. Chandeliers, statement pendants, artistic floor lamps, and designer sconces fall into this category. This layer is where personal taste shines, but it must harmonize with the room’s functional needs.
Balancing aesthetics and utility: A stunning chandelier can anchor a dining room, but if it’s the sole light source, it may fail as ambient lighting and create glare for seated guests. The key is to view decorative fixtures as part of the layered system—not replacements for other layers. A crystal chandelier in a formal dining room primarily expresses elegance (decorative role), while also contributing ambient light when dimmed and task light when brightened for meals. Understanding this dual nature helps prevent disappointment when beautiful fixtures prove functionally limited.
Selecting with intention:
– Scale and proportion: A fixture’s width often aligns with half to two-thirds the width of the table or island below it. For height, allow approximately 2.5–3 inches of fixture height per foot of ceiling height. In rooms with standard ceilings, keep fixtures under 24 inches tall to maintain comfortable clearance.
– Style integration: Match the fixture’s era and materials to your home’s architecture. A modern linear suspension complements clean-lined kitchens; a crystal chandelier honors traditional dining rooms. Intentional contrast (e.g., an industrial pendant in a farmhouse kitchen) can create exciting tension when done deliberately—ensure one unifying element (like metal finish) ties the contrast together.
– Light quality considerations: Many decorative fixtures use exposed bulbs. Opt for vintage-style Edison LEDs with warm filaments and diffused glass to minimize glare. For fabric shades, ensure the interior is light-colored to maximize light output. Always check lumen output specifications; a statement pendant over an island should provide meaningful illumination for the space below.
Common decorative dilemmas solved:
– “My chandelier is beautiful but too dim.” Solution: Install it on a dimmer and supplement with hidden ambient sources (e.g., cove lighting) and dedicated task lights (e.g., buffet lamps). Add LED candles in the chandelier arms for extra glow without heat.
– “I love this sculptural floor lamp, but it doesn’t provide enough light.” Solution: Use it as an accent/decor piece and add a dedicated task lamp nearby for reading. Position the decorative lamp to highlight its form while the task lamp serves function.
– “How do I light a vaulted ceiling without a central fixture?” Solution: Cluster multiple pendant lights at varying heights over a key area (like a dining table) to create a decorative focal point while providing functional light. Monorail systems offer adjustable positioning.
Budget-conscious styling:
– Thrift stores and flea markets often yield unique fixtures that can be rewired safely by a qualified professional. A vintage brass sconce restored with new wiring becomes a custom accent piece.
– Update existing fixtures with new shades—linen for diffusion, metal for directionality. Replacing a dated shade can transform a basic lamp.
– Group multiple inexpensive plug-in pendants (hung at different heights) over a kitchen island for a custom look. Use a tension rod mounted inside the cabinet to hang cords without ceiling installation.
Safety and maintenance note: Ensure decorative fixtures meet recognized safety standards (look for UL/ETL listing where applicable). Consider ease of cleaning—open-weave rattan shades collect dust; smooth glass is simpler to maintain. For high ceilings, choose fixtures with accessible bulbs or plan for periodic maintenance.
Layer 5: Dynamic Lighting – Adapting to Life’s Rhythms and Seasons
Dynamic lighting introduces variability—through dimming, color tuning, or smart controls—to align illumination with time of day, activity, season, or mood. This layer acknowledges that a room’s needs change: bright and energizing in the morning, focused at noon, warm and relaxing by evening, and adjusted for shorter winter days or extended summer evenings.
Why static lighting has limitations: Human-centric lighting research indicates that exposure to brighter, neutral-toned light during daytime may support alertness and circadian regulation, while warmer, dimmer light in the evening signals the body to prepare for rest. Fixed-output fixtures don’t account for this biological reality. A bedroom lit solely by cool-toned LEDs late at night may interfere with wind-down routines. Conversely, a kitchen with only warm light early in the morning might not provide the clarity needed for morning routines. Dynamic lighting bridges this gap between human patterns and built environments. Seasonal shifts matter too: during winter’s shorter days, dynamic systems can extend the perception of daylight; in summer, they can support longer evening activities outdoors.
Implementing adaptability:
– Dimming systems: The most accessible dynamic tool. Install dimmers on circuits where appropriate (ambient, task, accent). Modern trailing-edge dimmers work well with many LEDs. For whole-house consistency, dimmers from the same manufacturer often ensure matching fade curves.
– Color-tunable LEDs: Fixtures or bulbs that shift from warm white (2700K) to neutral daylight (4000K) via app, remote, or schedule. Ideal for home offices, bathrooms, and multi-use rooms. Look for options that maintain high CRI across temperatures.
– Smart scenes: Program presets like “Morning” (brighter, neutral light in kitchen/bath), “Movie Night” (dimmed ambient with accent on media console), or “Dinner Party” (warm ambient with focused table lighting). Voice commands add convenience where preferred.
– Sensors and automation: Occupancy sensors or daylight harvesting controls adjust light levels based on presence or available natural light—helpful for hallways, closets, and garages. Sensors can prevent lights from being left on accidentally.
Strategic room applications:
– Bedrooms: Smart bulbs that gradually brighten to simulate sunrise for gentle waking; dim to very low levels for nightlight function. Schedule lights to shift warmer after sunset automatically. In winter, extend “daylight” simulation slightly later to compensate for early darkness.
– Home offices: Tunable desk lamps that shift color temperature throughout the workday. Pair with software that adjusts screen temperature to match ambient light.
– Living rooms: Scenes that transition from “Reading” (task lights on, ambient dimmed) to “Entertaining” (accent lights highlighting art, decorative fixture at medium brightness). Include a “Goodnight” scene that turns off all lights except a subtle path light.
– Outdoor spaces: Adjust scenes seasonally—warmer, cozier light for winter evenings; brighter, neutral light for summer gatherings. Motion sensors with seasonal scheduling ensure pathways are safely lit during early winter darkness.
Avoiding complexity traps:
– Start small: Add dimmers to existing switches before investing in full smart systems. Master one room before expanding.
– Prioritize interoperability: Choose smart bulbs/fixtures within one ecosystem to avoid app fragmentation. Verify compatibility with your existing smart home setup.
– Maintain manual access: Physical switches should remain accessible for guests or quick adjustments. A switch beside the bed is often more reliable than voice commands when tired.
– Seasonal adaptation tip: In regions with distinct seasons, create two versions of key scenes—one optimized for summer’s long evenings, another for winter’s early darkness. Many smart systems allow seasonal scheduling.
Future-proofing: When renovating, consider running extra low-voltage wiring for future upgrades. Specify “smart-ready” dimmers that can integrate with home automation later. Document wiring locations in a home maintenance binder for future reference.
The Framework Synthesis: These five layers are interdependent. Ambient sets the stage; task ensures functionality; accent adds depth; decorative expresses style; dynamic adapts to life’s rhythms and seasons. Omit one layer, and the system may feel incomplete. Master their integration, and you unlock lighting’s full potential. A well-layered room feels intuitively right—you notice the comfort and atmosphere, not the mechanics.
Room-by-Room Application: Bringing the Framework to Life
Theory becomes transformative when applied to real spaces. Below, we dissect essential rooms, translating the five-layer framework into specific, actionable plans. For each room, we address unique challenges, prioritize layers based on function, and provide fixture recommendations tailored to common layouts. We include nuanced considerations often overlooked—like how ceiling height affects pendant placement or how cabinet depth influences under-cabinet lighting effectiveness. Seasonal and contextual adaptations are noted where relevant.
The Living Room: The Social Heart of the Home
The living room demands versatility—it must support relaxation, conversation, entertainment, and occasional tasks like reading or gaming. A single overhead light fails all these roles. This room often suffers from glare on screens or uneven lighting during evening conversations.
Layered strategy:
– Ambient: Recessed adjustable downlights (spaced to avoid glare on TV screens) combined with upward-facing floor lamps in corners. Dim to low levels for movie nights. For rooms without recessed options, use two matching floor lamps with drum shades positioned symmetrically.
– Task: Swing-arm wall lamps beside seating for reading; a focused floor lamp near gaming or hobby areas. Position reading lights so the bottom of the shade aligns with shoulder height when seated.
– Accent: Picture lights on artwork above the sofa; LED strip inside the media console to reduce screen glare and highlight components. Graze the wall behind the TV with subtle uplights to create visual depth.
– Decorative: A statement chandelier or linear suspension over a seating area (if ceiling height allows), or a sculptural floor lamp as a focal point. Ensure decorative fixtures don’t obstruct sightlines to the TV.
– Dynamic: Dimmers with scenes: “Relax” (warm, dimmed ambient), “Entertain” (accent lights on art, decorative fixture at medium brightness), “Clean” (all layers at higher brightness). Include a “Pathway” scene with subtle step lights for nighttime navigation. Seasonal note: In winter, program scenes to activate ambient lighting earlier in the afternoon to counteract short days.
Critical considerations:
– TV placement: Avoid positioning seating with windows or bright lights directly behind the TV. Bias lighting (a soft LED strip behind the TV) can reduce eye strain during viewing by softening the contrast between screen and dark room. Mount the strip so light reflects evenly on the wall behind the screen.
– Seating arrangement: Ensure every seat has access to task lighting within arm’s reach. For L-shaped sofas, place a floor lamp at the corner junction serving both sections.
– Vertical surfaces: Lighting walls (via sconces or uplights) often makes rooms feel larger than lighting only the floor. In narrow rooms, wall washing creates perceived width.
Common living room refinements:
– Recessed lights aimed directly at the TV screen cause reflections. Solution: Use adjustable trims aimed away from the screen, or replace with wall sconces positioned to light walls.
– Over-lighting the entire room for TV viewing. Solution: Rely on low-level ambient (like cove lighting) and task lights for pathways. Install a dedicated “TV mode” switch that dims all lights except bias lighting.
– Ignoring vertical surfaces: Lighting walls makes rooms feel more expansive.
Small living room adaptation: Use multi-functional fixtures—a floor lamp with an adjustable arm for reading and a downward shade for ambient light. Mirrors opposite light sources amplify perceived space. For studio apartments, use a room divider with integrated LED strips to define zones without walls.
The Kitchen: Where Safety and Style Intersect
Kitchens are high-activity environments where thoughtful lighting supports safety and enjoyment. Layering must address general illumination, precise task zones, and ambiance for dining areas. Shadows on cutting boards may contribute to accidents; inadequate sink lighting can make cleanup challenging. This room benefits from the most rigorous layering due to its functional demands.
Layered strategy:
– Ambient: Recessed downlights with a dimmer, supplemented by under-cabinet lighting that doubles as ambient fill when task lights are off. Avoid placing lights where they’ll cast shadows on work surfaces. Space recessed lights consistently in work zones.
– Task: Under-cabinet LED strips over all countertops; pendants over islands (spaced evenly, hung at a comfortable height above the surface); dedicated lights inside cabinets, pantries, and the range hood. For deep countertops, consider two parallel LED strips—one near the front edge, one midway—to minimize shadow zones.
– Accent: LED strips inside open shelving to highlight dishware; a focused spot on a decorative backsplash tile. Graze a textured range hood or statement range with subtle uplights.
– Decorative: Pendants over the island or sink chosen for style—ensure they provide adequate downward light. A statement fixture over a breakfast nook. Match metal finishes to cabinet hardware for cohesion.
– Dynamic: Separate dimmer controls for ambient, under-cabinet, and pendant circuits. Scene example: “Cook” (all task lights bright), “Clean” (ambient and task at higher brightness), “Dine” (pendants dimmed, under-cabinet off). Motion sensors inside pantry cabinets activate lights when doors open. Seasonal note: In summer, take advantage of extended daylight by using sensors to dim artificial lights when natural light is sufficient near windows.
Zone-specific details:
– Countertops: Light should come from in front of you (under-cabinet) to avoid shadows from your body. For L-shaped counters, ensure corner coverage with a perpendicular strip at the junction. Test placement by standing at the counter—your shadow should fall behind you.
– Sink: A pendant or recessed light directly above prevents shadows while washing hands or produce. For vessel sinks, position light slightly forward.
– Range: Hood-integrated lights are essential, but supplement with adjacent recessed lights to cover the entire cooking surface. Avoid placing lights directly above burners where steam and grease accumulate.
– Island: For islands over 6 feet long, multiple pendants are often appropriate; for smaller islands, two may suffice. Center the arrangement over the island’s midpoint.
Safety considerations:
– Fixtures within proximity to sinks or cooking surfaces should be rated for damp or wet locations as appropriate (check manufacturer specifications).
– Under-cabinet lights should have a diffuser to prevent seeing individual LED dots. Aluminum channels with frosted covers provide even light distribution.
– Avoid glass fixtures directly over high-heat cooking surfaces. Use metal or high-temperature plastic housings rated for the location. Verify maximum wattage ratings for enclosed fixtures.
Budget kitchen upgrade path:
1. Add plug-in under-cabinet LED strips (with remote dimmer).
2. Replace outdated overhead fixture with a bright, dimmable flush mount.
3. Install two inexpensive pendants over the island.
4. Add puck lights inside upper cabinets.
5. Upgrade bulbs to high-CRI (90+) LEDs for more accurate color perception during food prep.
The Bedroom: Sanctuary for Rest and Renewal
Bedrooms require lighting that supports winding down, morning routines, and occasional tasks—all while promoting relaxation. Harsh overhead lights can disrupt circadian rhythms. This room benefits from thoughtful dynamic layering to support sleep hygiene across seasons.
Layered strategy:
– Ambient: Cove lighting or wall sconces with upward/downward light; avoid central ceiling fixtures where possible. Dim to very low levels for bedtime. For rooms without cove options, use two matching floor lamps with fabric shades positioned in opposite corners.
– Task: Swing-arm wall lamps or adjustable bedside lamps for reading (positioned so light falls on the book, not in eyes); a dedicated light at the dressing area or vanity. For shared beds, ensure independent controls for each side.
– Accent: Uplights grazing a textured headboard wall; discreet LED strips under the bed frame for safe nighttime navigation. Highlight architectural details like exposed beams.
– Decorative: A low-hanging pendant on each side of the bed (if ceiling height allows) or a sculptural floor lamp in a corner. Choose fixtures with fabric shades to diffuse light softly.
– Dynamic: Smart bulbs with circadian scheduling: neutral-white in the morning for waking, shifting warmer after sunset. Motion-activated under-bed lighting for nighttime bathroom trips (activates at low brightness). “Goodnight” scene that turns off all lights except a subtle path light. Seasonal note: In winter, extend “sunrise simulation” slightly later to align with natural dawn; in summer, activate earlier to match longer days.
Bedside lighting considerations:
– Height: Wall-mounted fixtures should place the bottom of the shade near shoulder height when seated (approx. 48–52 inches from floor). For reading in bed, the light source should be positioned above pillow level without causing glare.
– Reach: Swing-arm lamps must extend far enough to position light over the book. Test arm flexibility before purchasing.
– Controls: Three-way switches or smart controls at the door and bedside allow adjusting lights without getting out of bed. For accessibility, include rocker switches that are easy to operate.
Closet lighting essentials:
– Motion-sensor LED strips on closet rods or shelves activate when doors open. For reach-in closets, battery-operated puck lights with magnetic mounts work well.
– For walk-in closets, recessed adjustable lights aimed at clothing rods; avoid shadows by placing lights on both sides of the space. Install lights above hanging rods and within shelving units.
– Color accuracy matters—use bulbs with CRI >90 to distinguish similar shades of clothing. Test by holding garments under the light—differences should be clear.
Creating a restful environment:
– Minimize blue-rich light sources before bedtime. Use warm dim bulbs that mimic candlelight. Cover LED indicators on electronics with opaque tape if they cause distraction.
– Hide direct light sources: no exposed bulbs. Use fabric shades or indirect fixtures. Install blackout curtains to control external light pollution from streetlights.
– Position beds away from direct light paths. If a window faces east, use blackout shades to prevent early morning light disruption in summer months.
Small bedroom solutions:
– Wall-mounted swing-arm lamps save nightstand space. Choose models with integrated USB ports if device charging is needed.
– Use a single multi-light fixture (e.g., a chandelier with dimmable bulbs) controlled by a smart system to simulate layers.
– Mirrors opposite windows amplify natural ambient light during the day.
The Bathroom: Precision for Grooming and Relaxation
Bathrooms merge high-focus task needs (grooming) with spa-like ambiance. Poor lighting can lead to makeup mishaps or a sterile atmosphere. This room requires meticulous attention to shadow elimination and color accuracy—especially around vanities.
Layered strategy:
– Ambient: Recessed downlights with moisture-resistant housings where appropriate; avoid placing directly over the shower unless rated for wet locations. Supplement with a dimmable ceiling fixture. Space lights to avoid dark spots.
– Task: Vertical sconces at eye level on both sides of the mirror (critical for eliminating facial shadows). For vanities without side space, use an overhead mirror-integrated light with even, shadow-free distribution. Install dedicated lights inside medicine cabinets.
– Accent: Recessed adjustable spotlights grazing a tile feature wall; LED strips under floating vanities for a modern glow. Highlight architectural details like arched doorways.
– Decorative: A moisture-rated pendant over a freestanding tub or a stylish sconce beside the mirror. Choose finishes that resist moisture corrosion (brushed nickel, matte black).
– Dynamic: Separate dimmers for ambient and vanity lights. Smart mirror with integrated lighting that adjusts color temperature from neutral (morning grooming) to warm (evening relaxation). Motion-activated nightlights in the baseboard. Seasonal note: In winter, slightly brighter morning lighting can help counteract gloomy days; in summer, rely more on natural light with dimmable supplements.
Mirror lighting mastery:
– Placement principle: Light sources at eye level, flanking the mirror, are generally most effective for eliminating facial shadows. Overhead lights alone often cast shadows under eyes, nose, and chin. For wider mirrors, additional sconces above may help.
– Brightness: Aim for sufficient illumination on the face for grooming tasks. Use multiple bulbs for even coverage. Test by applying makeup under the lights—foundation should look natural.
– CRI is important: Choose bulbs/fixtures with CRI ≥90. Test by checking your skin tone in the light—it should look natural.
Zone-specific requirements:
– Shower/tub area: Fixtures must be rated for wet locations where required. Recessed shower lights should have appropriate lenses and be positioned to avoid direct spray. For steam showers, verify fixtures are rated for high humidity.
– Toilet area: A discreet nightlight or motion-activated step light ensures safety without disrupting sleep. Install a low-level LED strip under the tank or within the baseboard.
– Double vanities: Each sink benefits from independent lighting controls to accommodate different users’ preferences. Run separate circuits during renovation if possible.
Ventilation note: Ensure all enclosed fixtures allow proper heat dissipation. Leave adequate airspace around recessed housings. In high-humidity climates, consider ventilation near lighting fixtures to reduce condensation.
Renter-friendly bathroom upgrades:
– Adhesive-backed LED mirror lights (plug-in or battery-operated). Look for models with adjustable color temperature.
– Replace existing vanity bulbs with high-CRI LEDs. Verify base type before purchasing.
– Add a plug-in wall sconce beside the mirror (if outlet available). Use a cord cover to route wiring neatly.
The Dining Room: Crafting Connection Through Light
Dining rooms thrive on intimacy and focus. Light should draw attention to the table, food, and faces—not the corners of the room. This space benefits from precise control over light pools to enhance the dining experience across seasons and occasions.
Layered strategy:
– Ambient: Very low-level ambient (e.g., dimmed cove lighting or a single recessed light in a hallway) to maintain orientation without competing with the table. Avoid bright perimeter lighting that distracts from the centerpiece.
– Task: The chandelier or pendant cluster over the table serves as the primary task light—ensuring adequate illumination for eating and reading menus.
– Accent: Picture lights on wall art; uplights highlighting a china cabinet or architectural detail. Graze a textured wall behind the buffet for depth.
– Decorative: The centerpiece fixture—choose scale carefully. Linear suspensions work well over rectangular tables; round chandeliers over round tables. Ensure the fixture complements table shape.
– Dynamic: A dimmer is essential. Lower the fixture for intimate dinners (light pool concentrated on the table), raise slightly for larger gatherings. Scene example: “Dinner” (fixture at medium brightness, ambient off), “Buffet” (accent lights on sideboard), “Party” (all layers bright with warm temperature). Seasonal note: For holiday gatherings in winter, program a “Festive” scene with slightly warmer tones and accent lights highlighting seasonal decor.
Fixture positioning considerations:
– Bottom of fixture typically hangs 30–36 inches above the table surface. For longer tables, multiple pendants or a linear fixture spanning most of the table length may work well.
– Ensure the fixture’s width allows clearance from walls or cabinets. For a 48-inch wide table, a fixture 24–32 inches wide is often appropriate.
– Test sightlines: Sit in each chair position—no one should have the fixture directly in their line of sight causing glare.
Enhancing the dining experience:
– Light quality: Warm light (2700K) often makes food look appetizing. Avoid very cool temperatures that may make dishes appear sterile. High-CRI bulbs (90+) support vibrant food colors.
– Glare control: Use shades that direct light downward; avoid exposed bulbs visible when seated. Frosted glass diffusers soften harsh points of light.
– Flexibility: If the room doubles as a home office or play area, add recessed adjustable lights on a separate dimmer for daytime tasks. Install a secondary switch near the doorway for quick ambient control.
Small dining nook adaptation:
– A single pendant with a dimmer often suffices. Choose a fixture with adjustable height for versatility.
– Wall sconces on adjacent walls provide ambient fill without taking visual space. Position sconces approximately 60 inches from floor, aimed slightly downward.
– Use a mirror opposite a window to amplify natural light during daytime meals.
The Home Office: Optimizing Focus and Well-being
Home offices demand lighting that minimizes eye strain, supports prolonged focus, and adapts to video calls. Poor lighting is a common contributor to visual discomfort during screen work.
Layered strategy:
– Ambient: Indirect cove lighting or upward-facing floor lamps to reduce screen glare. Avoid windows or bright lights directly behind you on video calls. Target moderate ambient levels to balance with screen brightness.
– Task: An adjustable desk lamp with high CRI (>90) and flicker-free operation. Position to light the desk surface without casting shadows on the keyboard or reflecting on the screen. Place lamp on the opposite side of your dominant hand.
– Accent: A small spotlight on a bookshelf or inspiration board. Graze a textured wall behind the desk to reduce visual fatigue from flat surfaces.
– Decorative: A stylish desk lamp that complements your decor—ensure it provides functional light. Choose designs with adjustable arms and heads.
– Dynamic: Tunable-white desk lamp that shifts from neutral (morning focus) to warm (evening work). Scene example: “Focus” (task light bright, ambient dimmed), “Video Call” (ambient light on face, task light off to avoid glare), “Break” (all lights dimmed with warm temperature). Seasonal note: In winter, slightly brighter ambient lighting during short days can support alertness; in summer, leverage natural light with adjustable supplements.
Ergonomic essentials:
– Screen positioning: Place monitors perpendicular to windows to minimize glare. Bias lighting (a soft LED strip behind the monitor) can reduce contrast between screen and dark room.
– Desk lamp placement: Position on the opposite side of your dominant hand to prevent hand shadows. Angle the lamp so light falls on the work surface, not directly into eyes.
– Natural light synergy: Position desk to face natural light sources when possible, but use adjustable blinds to control intensity. East-facing windows provide gentle morning light; north-facing offer consistent diffuse light.
Video call lighting tip: A ring light or softbox positioned in front of you (not above) creates even, flattering illumination for cameras. Avoid overhead lights that cast shadows under eyes. Test your setup by recording a short video—check for harsh shadows.
Supporting visual comfort:
– Follow the 20-20-20 rule (every 20 minutes, look at something 20 feet away for 20 seconds), supported by balanced ambient light.
– Use matte desk surfaces to minimize reflections. Avoid glossy finishes that create hot spots.
– Enable night mode on devices after sunset, complemented by warm ambient lighting. Schedule smart bulbs to shift warmer automatically at dusk.
Hallways, Staircases, and Entryways: Safety and First Impressions
These transitional spaces are often neglected but critical for safety and setting the home’s tone. Poorly lit hallways may contribute to trips; dark staircases pose fall risks. These areas require strategic layering focused on guidance and safety.
Layered strategy:
– Ambient: Recessed downlights spaced consistently; wall sconces at regular intervals for vertical illumination (makes narrow halls feel wider). For long hallways, stagger light placements to avoid tunnel vision.
– Task: Step lights recessed into stair risers or wall-mounted at stair landings. Motion-activated path lighting for nighttime safety. Install lights at the top and bottom of staircases.
– Accent: A picture light highlighting artwork in the entryway; uplights grazing a textured wall. Highlight architectural features like arched openings.
– Decorative: A statement pendant in a two-story foyer; a stylish wall sconce beside the front door. Choose fixtures that welcome guests—warm light creates immediate warmth.
– Dynamic: Motion sensors that activate lights at low brightness overnight; smart controls that brighten when doors open. “Welcome home” scene that gradually brightens entryway lights when motion is detected after dark. Seasonal note: In winter, ensure motion sensors activate earlier in the evening due to shorter days; adjust sensitivity to avoid false triggers from falling leaves in autumn.
Staircase safety considerations:
– Light every third step minimally, but ideally every step. Recessed step lights should be rated for wet locations if near exterior doors.
– Fixtures must be shielded to avoid glare when ascending/descending. Use frosted lenses or baffles to diffuse light.
– Use warm, dimmed light at night to preserve night vision. Motion sensors should activate at low brightness after bedtime.
– Handrail-integrated LED strips provide continuous guidance. Battery-operated options exist for retrofits.
Entryway impact:
– The first light guests see should feel welcoming. A dimmable chandelier or sconces flanking a mirror create instant warmth. Position a mirror to reflect light deep into the space.
– Include a dedicated outlet near the door for seasonal decorations (e.g., holiday wreath lights). Install a switched outlet controlled by the entryway light switch.
– For small entryways, use a single multi-arm sconce that provides both ambient and accent light. Choose fixtures with upward and downward light distribution.
Outdoor Living Spaces: Extending Ambiance Beyond Walls
Patios, decks, and porches benefit from layered lighting for safety, functionality, and ambiance. Outdoor lighting must balance visibility with atmosphere—avoiding overly bright, uniform lighting that feels institutional.
Layered strategy:
– Ambient: Low-voltage path lights along walkways; string lights overhead (hung in a zig-zag pattern for even coverage). For pergolas, install LED tape within beams for soft downward glow.
– Task: Under-counter lighting on outdoor kitchens; bright, damp-rated fixtures over dining tables. Position task lights to avoid casting shadows on cooking surfaces.
– Accent: Well lights uplighting trees or architectural features; underwater lights in water features. Graze textured walls or stone fireplaces with subtle uplights.
– Decorative: Lanterns on posts; flameless candles on tables. Choose weather-resistant materials (powder-coated aluminum, marine-grade stainless steel).
– Dynamic: Smart controls for scheduling; motion sensors for security areas. “Entertaining” scene that brightens dining area while dimming perimeter lights. Seasonal note: Adjust scenes for seasons—warmer, cozier light for winter evenings; brighter, neutral light for summer gatherings. In fall, ensure pathways are well-lit earlier due to earlier darkness; in spring, extend lighting for longer evening use.
Safety and durability:
– All fixtures must be rated for outdoor use (UL Wet or Damp Location as appropriate). Verify IP ratings for the specific location—IP65 for exposed areas, IP44 for covered porches.
– Path lights should cast light downward to avoid glare; spacing every 8–10 feet. Install lights on the inside of curves for better guidance.
– Use warm color temperatures (2700K–3000K) to create a cozy atmosphere; avoid very cool white which can feel institutional. High-CRI bulbs make outdoor spaces feel more inviting.
– Bury low-voltage cables at recommended depths, or use conduit for protection. Mark cable locations before landscaping to avoid future damage.
Deck railing integration: LED strips mounted under rail caps provide subtle step lighting. Use aluminum channels with frosted covers to diffuse light evenly. For composite decking, choose clips that attach without drilling.
Fire pit area: Avoid overhead lights that ruin the ambiance; rely on low-level ambient from surrounding landscape lights. Position path lights to guide seating without shining directly into eyes.
Pool safety: Install underwater lights rated for submersion. Place lights to eliminate dark spots. Add motion-activated step lights around pool decks. Always follow local electrical codes and consult qualified professionals for pool-area lighting.
Overcoming Real-World Frictions: Budget, Rentals, and Existing Homes
Perfect lighting plans meet real-world constraints. Here’s how to adapt the framework without compromise, drawing from common retrofit scenarios and cost-effective solutions.
Budget Constraints: Strategic Phasing
You don’t need a full renovation to improve lighting. Prioritize based on impact and daily usage:
1. Phase 1 (Under $100): Replace bulbs with quality LEDs (2700K–3000K, CRI >90 where color accuracy matters). Add plug-in task lamps where needed. Install dimmer switches on existing overhead lights (verify LED compatibility first). This phase alone transforms many homes by eliminating harsh light and adding control.
2. Phase 2 ($100–$500): Add under-cabinet lighting in the kitchen; install wall sconces in the bedroom or bathroom (hardwired or plug-in); upgrade bedside lamps to adjustable-arm styles. Focus on rooms where you spend evening hours—living room and primary bedroom often yield high satisfaction.
3. Phase 3 ($500+): Hire a qualified electrician to add recessed lights in key areas; invest in smart lighting system for dynamic control; replace outdated fixtures with layered solutions. Prioritize safety-critical zones first (kitchen task lighting, staircase path lights).
Pro tip: Focus improvements on rooms where you spend the most time. Track energy savings from LED upgrades—many utility companies offer rebates. Document before/after photos to visualize progress.
Rental-Friendly Solutions: No Permanent Changes
Renters can achieve layered lighting with creativity and landlord-friendly approaches:
– Ambient: Use multiple floor lamps with warm-white bulbs; smart bulbs in existing fixtures (with landlord permission—offer to revert upon moving). Position lamps to bounce light off walls.
– Task: Clamp-on desk lamps; plug-in under-cabinet LED strips (removable adhesive backing). Battery-operated puck lights for interior cabinets.
– Accent: Battery-operated puck lights inside shelves; clip-on picture lights. Adhesive-backed LED strips for highlighting features (remove with hairdryer to minimize residue).
– Decorative: Statement floor lamp or plug-in pendant (hung from a tension rod). Choose pieces that transport easily.
– Dynamic: Smart plugs to control lamps; portable dimmer switches for plug-in fixtures. Voice-controlled smart bulbs (if permitted) offer scene control without wiring changes.
Landlord communication: Frame upgrades as safety or comfort enhancements (e.g., “Adding under-cabinet lights supports safer food preparation”). Offer to revert changes upon moving out. Provide product links showing non-invasive installation. Document approvals in writing.
Working with Existing Fixtures: Retrofitting Wisdom
You can’t always start from scratch. Optimize what you have:
– Central ceiling fixture: Add a dimmer and supplement heavily with floor/table lamps for task and accent layers. Replace globes with etched glass diffusers to soften harsh light.
– Recessed lights in suboptimal places: Install adjustable trims to redirect beams; add decorative shades (“eyeballs”) to diffuse harsh light. For non-adjustable cans, beam-shaping filters can modify light spread.
– Outdated vanity lights: Replace bulbs with high-CRI LEDs; add plug-in wall sconces beside the mirror if wiring allows. Use adhesive hooks for temporary battery-operated sconces.
– Track lighting: Reposition heads to highlight new focal points. Replace outdated bulbs with modern LEDs matching your color temperature scheme.
When to consult a professional:
– Adding new circuits or moving fixtures requires licensed electricians. Verify credentials and insurance.
– If existing wiring is aluminum (common in homes built 1965–1973), consult an electrician before installing dimmers or new fixtures—special connectors may be required.
– Always verify local electrical codes—especially for wet/damp locations. Permits may be required for hardwired modifications. When in doubt, seek professional assessment.
Common Refinements and How to Address Them
-
Refinement: Matching all fixtures to a single “finish” (e.g., all brushed nickel).
Approach: Mix metals intentionally—e.g., matte black pendants with brass sconces—to add depth. Ensure finishes share undertones (warm vs. cool). Limit to 2–3 metal types per open floor plan. -
Refinement: Ignoring natural light patterns.
Approach: Observe how sunlight moves through each room at different times and seasons. Position task lights to complement, not fight, daylight. Use sheer curtains to diffuse harsh afternoon sun while maintaining ambient light. Adjust dynamic scenes seasonally. -
Refinement: Over-lighting.
Approach: Embrace thoughtful darkness. Not every corner needs illumination. Use layers to create pools of light that guide movement and focus attention. Install multiple switches to control zones independently—avoid “all-or-nothing” lighting. -
Refinement: Forgetting maintenance access.
Approach: Choose fixtures with easy bulb replacement. Avoid placing recessed lights directly over furniture where changing bulbs requires moving heavy items. Document bulb types in a home maintenance log.
Your Questions, Answered
Q: How many lumens do I need per room?
A: Lumens alone don’t tell the full story. Focus on layers: ambient provides baseline illumination, task adds concentrated light where needed, and accent uses focused beams. Room function matters more than square footage—a kitchen benefits from brighter task lighting than a bedroom. Use a light meter app for general guidance (aim for moderate ambient levels, higher at task surfaces), but prioritize how the space feels. Quality (CRI, dimmability) often matters more than raw lumen counts.
Q: What’s the difference between lumens, lux, and foot-candles?
A: Lumens measure total light output from a source. Lux measures lumens per square meter (illuminance on a surface). Foot-candles are lumens per square foot (1 foot-candle ≈ 10.76 lux). For home use, lux is practical: moderate ambient relaxation (50–100 lux), detailed tasks like chopping vegetables (300–500 lux). Smartphone light meter apps provide reasonable estimates—measure at task surfaces (countertop, desk) for best results. Industry guidelines (IESNA) offer recommended levels for specific activities.
Q: Are LED bulbs really better than incandescent or CFL?
A: For most residential applications today, quality LEDs offer significant advantages: energy efficiency (using substantially less energy than incandescents), longer lifespans (15,000–50,000 hours), excellent color quality (look for CRI >90), dimmability, instant-on capability, and no mercury (unlike CFLs). Initial cost is higher but often offset by energy savings and reduced replacement frequency. Quality varies—invest in reputable brands with verified specifications. Avoid ultra-cheap LEDs that may flicker or shift color over time.
Q: How do I choose the right color temperature?
A: Warm white (2700K–3000K) generally suits living rooms, bedrooms, and dining rooms to support relaxation. Neutral white (3000K–4000K) often works well in kitchens, bathrooms, and home offices for task clarity. Avoid temperatures above 4000K in living spaces—they can feel clinical. For dynamic control, tunable-white LEDs offer flexibility. Industry standards provide color consistency bins; look for “tight binning” when purchasing multiple bulbs. Test bulbs in your space before committing to large quantities—color perception varies under different conditions.
Q: Can I mix different color temperatures in one room?
A: Intentionally, yes—with care. For example, 2700K ambient lights with 3000K task lights in a kitchen can work if the contrast is subtle. Avoid mixing warm and cool lights on the same surface (e.g., warm under-cabinet lights with cool recessed lights on a countertop), as it may create visual discord. When in doubt, maintain consistency within each layer. Smart bulbs can gradually transition temperatures throughout the day rather than abrupt changes.
Q: What is CRI, and why does it matter?
A: Color Rendering Index (CRI) measures how accurately a light source reveals colors compared to natural light. Scale is 0–100; 90+ is excellent for homes. High CRI is particularly valuable in bathrooms (for makeup), kitchens (for food prep), and art displays. Always check CRI ratings—many budget LEDs have CRI <80, making colors look dull. For skin tones and food, CRI Ra9 (red rendering) is especially important—look for specifications mentioning Ra9 >90. High-CRI lighting can reduce eye strain by providing more natural visual information.
Q: How do I prevent recessed lights from looking like “swiss cheese”?
A: Avoid uniform grids. Stagger placements, use varying beam angles (wide floods for ambient, narrow spots for accent), and install adjustable trims. Supplement with other fixture types (sconces, pendants) to reduce reliance on recessed lights. In living areas, limit recessed lights to perimeter zones and use cove lighting for central ambient. For existing grids, decorative trim rings or replacing some cans with shallow-profile flush mounts can help. Remember: fewer well-placed lights often outperform many poorly placed ones.
Q: Are smart lights worth the investment?
A: For dynamic layering and convenience, they can be valuable—especially if you appreciate scheduling, scenes, or circadian support. Start with high-impact areas: smart dimmers on main switches, tunable bulbs in bedrooms/bathrooms. Prioritize ecosystems with strong reliability and interoperability. Avoid inexpensive, non-interoperable brands that may become obsolete. Consider non-financial benefits like automated warm-dim schedules supporting evening wind-down routines. Calculate potential energy savings based on your usage patterns.
Q: How do I light a room with no overhead fixture?
A: Combine multiple floor lamps (one with upward light for ambient, one with downward shade for task), wall sconces, and table lamps. Use LED tape inside shelves or under cabinets for hidden ambient light. In rentals, plug-in track lighting systems offer flexible overhead-like solutions without wiring. Position lamps at varying heights to create visual interest—avoid lining all lamps at the same level. For large rooms, a central floor lamp with multiple arms can cast light upward and downward simultaneously.
Q: What’s the safest way to light a staircase?
A: Install step lights recessed into risers (rated for wet locations if near exterior), supplemented by wall sconces at top and bottom landings. Use motion sensors with dimming to activate low-level light at night. Never rely solely on a single overhead light at the top of stairs—it can create dangerous shadows on steps. For open-riser stairs, lights within the tread itself may be appropriate. Test lighting at night before finalizing—walk the stairs slowly to identify shadow zones. Consult a qualified electrician for installation.
Q: How often should I replace LED bulbs?
A: Quality LEDs last 15,000–50,000 hours (many years at typical usage). Replace when output dims noticeably or color shifts. To maximize lifespan, ensure fixtures allow heat dissipation (avoid fully enclosed fixtures unless the bulb is rated for it). Keep a log of installation dates—replace bulbs in batches rather than waiting for failures. For critical areas (staircases, kitchens), proactively replace bulbs after several years regardless of function. Recycle spent LEDs at designated facilities.
Q: Can lighting support better sleep?
A: Thoughtfully designed lighting can complement sleep hygiene practices. Exposure to cooler, brighter light after sunset may interfere with melatonin production. Implement warm, dimmable lighting (2700K dimmed to low brightness) in bedrooms 1–2 hours before bed. Smart bulbs with circadian schedules can automatically shift warmer in the evening. Minimize blue-light sources before bedtime (phones, TVs) or use device night modes. Research suggests that reducing blue-rich light exposure before bed may support smoother sleep onset. Pair lighting adjustments with other consistent sleep routines for best results.
Conclusion and Your Next Step
Lighting design is not a luxury reserved for professionals—it’s a fundamental tool for shaping how we live, feel, and connect within our homes. By embracing the five-layer framework, you transform lighting from an afterthought into an intentional system that serves both practical needs and emotional well-being across seasons and life stages. Remember the core pillars: ambient sets the foundation, task ensures functionality, accent adds depth, decorative expresses identity, and dynamic adapts to rhythms and contexts. This integrated approach has been thoughtfully applied in countless homes, often resulting in spaces that feel more comfortable, functional, and personally resonant.
Recap: Three Foundational Principles
- Move beyond single-source lighting. Every room benefits from multiple layers working together. Start by identifying which layer is missing in your most-used space.
- Prioritize control. Dimmers, separate switches, and adaptable scenes unlock versatility. Even one well-placed dimmer switch significantly increases lighting utility.
- Honor natural rhythms. Warm, dimmable light in evenings supports wind-down; brighter, neutral light by day boosts clarity. Align your lighting with daylight patterns and seasonal shifts for holistic well-being.
The 24-Hour Rule: One Tiny Action
Within the next 24 hours, conduct a gentle “lighting observation” of one room you use most frequently. Sit in each seating position at different times of day. Notice:
– Where do shadows fall during key tasks?
– Is there glare on screens or reflective surfaces?
– Can you adjust light levels for different activities or moods?
– What emotion does the current lighting evoke?
Armed with these observations, choose one micro-improvement: replace a bulb with higher CRI, add a plug-in task lamp, adjust a lamp position, or install a dimmer switch. Momentum begins with a single step. Document your change with a before/after photo—this visual record fuels continued progress.
The Bigger Picture
Your home’s lighting is a living system—not a static installation. As your needs evolve, so can your lighting. Start small, layer intentionally, and observe the subtle yet profound impact on daily life. The goal isn’t perfection; it’s progress toward spaces that feel authentically yours—spaces that welcome, inspire, and restore. When lighting works harmoniously, you stop noticing the fixtures and start feeling the difference: deeper conversations in warmly lit living rooms, safer meal prep under thoughtfully placed task lights, more restful transitions in bedrooms tuned to natural rhythms. This is the true power of layered lighting—not just illumination, but transformation.
Explore Our Complete Lighting System:
[The Ultimate Guide to Choosing Light Bulbs: CRI, Kelvin, and Lumens Decoded] | [10 Renters’ Hacks for Dramatic Lighting Upgrades (No Drilling Required)] | [Smart Lighting Setup: A Room-by-Room Blueprint for Circadian Health] | [Outdoor Lighting Safety Checklist: Avoiding Glare, Shadows, and Electrical Hazards] | [DIY Under-Cabinet Lighting Installation: A Step-by-Step Photo Guide] | [Lighting for Small Spaces: Creating Illusions of Depth and Volume] | [Seasonal Lighting Transitions: Adapting Your Home’s Ambiance Year-Round]