Transform even the tiniest nook into a powerhouse of focus and efficiency with our step-by-step system—designed for real-world constraints and human needs.
Working in a small home office doesn’t mean sacrificing productivity, comfort, or professional credibility. Whether you’re converting a closet, claiming a corner of your living room, or optimizing a compact spare nook, this comprehensive guide delivers a human-centered framework to maximize every inch while supporting your physical well-being, mental clarity, and workflow efficiency. Forget generic Pinterest inspiration—this is your actionable blueprint for building a space that works with your life, not against it.
Introduction
The modern work landscape has permanently shifted, yet much home office advice remains trapped in a fantasy of dedicated rooms with floor-to-ceiling bookshelves and panoramic views. For the vast majority of remote workers, freelancers, students, and side-hustlers, reality looks different: a desk squeezed beside the laundry hamper, a laptop balanced on the kitchen counter between meals, or a folding table that vanishes each evening to reclaim living space. This disconnect between idealized imagery and lived experience creates unnecessary frustration, physical strain, and diminished productivity. Drawing upon established principles of environmental psychology, ergonomic science, and spatial design research, this guide bridges that gap. We move beyond superficial “hacks” to deliver a holistic system addressing the interconnected physical, cognitive, and emotional dimensions of working in tight quarters. This isn’t about making do—it’s about designing intentionally so constraints become catalysts for smarter, more sustainable work habits. When space is limited, every choice carries amplified weight; this framework ensures each decision serves multiple purposes, reduces friction, and actively supports your success.
The SPACE Framework: Your Blueprint for a Functional Micro Office
Forget overwhelming checklists. The SPACE Framework provides a memorable, sequential process designed specifically for spatial constraints. SPACE stands for Survey, Configure, Adapt, Personalize, and Evolve. This isn’t a rigid recipe but a dynamic cycle—each phase informs the next, and you’ll naturally loop back as your needs change. Unlike fragmented tips found elsewhere, SPACE integrates ergonomics, psychology, technology, and aesthetics into one cohesive strategy. It acknowledges that your micro office exists within a larger living ecosystem and must harmonize with it. By following this sequence, you avoid costly mistakes (like buying a desk that blocks a doorway) and build a foundation that grows with you. The framework’s power lies in its emphasis on your unique context—your body, your work style, your household dynamics—rather than prescribing a one-size-fits-all solution. Let’s walk through each phase with meticulous detail.
Step 1: Survey Your Space and Needs (The Non-Negotiable Foundation)
Skipping this step is the single most common reason micro offices fail. Enthusiasm leads to impulsive purchases that create new problems. Surveying is deliberate observation. Allocate 60–90 minutes with a notebook (digital or physical). Divide your survey into two parallel tracks: Physical Space Audit and Workflow & Human Audit.
Physical Space Audit: Measure Twice, Imagine Once
Precise Dimensions: Measure floor area (length × width), but also critical vertical clearances: ceiling height, distance from floor to window sill, depth of alcoves or closets. Note the location of immovable elements: electrical outlets (count them!), light switches, radiators, vents, door swings (open the door fully—does it hit where a chair would be?), and window operation. Sketch a simple floor plan. Accuracy matters: a desk listed as “48 inches wide” might not fit if your measured space is 47.5 inches due to baseboards.
Light Analysis: Track natural light over one full day. Note: Which direction does the window face? (North light is cool and consistent; South is warm and intense; East is gentle morning light; West is harsh afternoon glare). When does direct sun hit potential desk spots? Does glare reflect off light-colored walls or floors? Identify existing artificial light sources and their quality (harsh overhead LEDs? warm lamp glow?).
Acoustic Environment: Sit quietly in the potential workspace at different times. Identify noise sources: street traffic patterns, HVAC cycles, refrigerator hum, household activity zones (kitchen clatter, TV room, laundry room). Note reverberation—hard surfaces (tile, glass, bare walls) amplify sound; soft surfaces (rugs, curtains, bookshelves) absorb it.
Traffic Flow: Map household movement. Where do people walk to reach the kitchen, bathroom, or living area? Placing your desk directly in a high-traffic path guarantees constant visual and auditory interruptions. Identify “dead zones”—areas rarely traversed but underutilized.
Workflow & Human Audit: Know Thyself (and Thy Work)
Work Type Deep Dive: Categorize your primary tasks. Are you:
* Deep Focus Work? (Writing, coding, analysis—requires minimal distraction)
* Creative Work? (Design, brainstorming—benefits from visual inspiration)
* Collaborative/Communication Heavy? (Frequent video calls—requires good lighting, professional backdrop)
* Administrative/Logistical? (Data entry, scheduling—requires efficient storage)
Most people blend types. Assign rough percentages (e.g., 60% deep focus, 30% video calls). This dictates priorities.
Equipment Inventory: List every item needed daily: laptop/desktop, monitor(s), keyboard, mouse, notebook, pen holder, phone, headset. Then list weekly items: printer, scanner, filing cabinet. Be ruthless. Does that printer need to live on your desk, or can it reside in a closet and be retrieved only when needed? This inventory prevents “desk creep.”
Body & Comfort Baseline: Note current pain points. Do your shoulders tense after 30 minutes? Is neck strain common? Do your feet dangle uncomfortably? Consider vision needs—do you require strong task lighting for reading physical documents? Acknowledge these before setup to proactively address them.
Household Context: Who shares your space? Partners, children, roommates, pets? What are their schedules and noise levels? Is privacy during calls essential? Does the space need to “disappear” visually at the end of the workday for family harmony? Honesty here prevents future conflict.
Why This Step is Crucial: A survey transforms guesswork into data-driven decisions. Example: Measuring reveals your ideal desk spot has only one outlet behind it. Instead of buying a desk and then realizing you need a hazardous extension cord snaking across the floor, your survey prompts you to plan for a discreet power strip mounted underneath the desk before purchase. Another example: Your workflow audit shows frequent video calls. You prioritize a location with a neutral, uncluttered wall behind you and sufficient overhead light—before you fall in love with a desk facing a busy hallway. Common mistakes include measuring only floor space (ignoring door swings), underestimating equipment needs (“I’ll just use my laptop screen!”), and neglecting household dynamics. Take photos of the space from multiple angles. Label your sketch with measurements and notes. This document becomes your project bible.
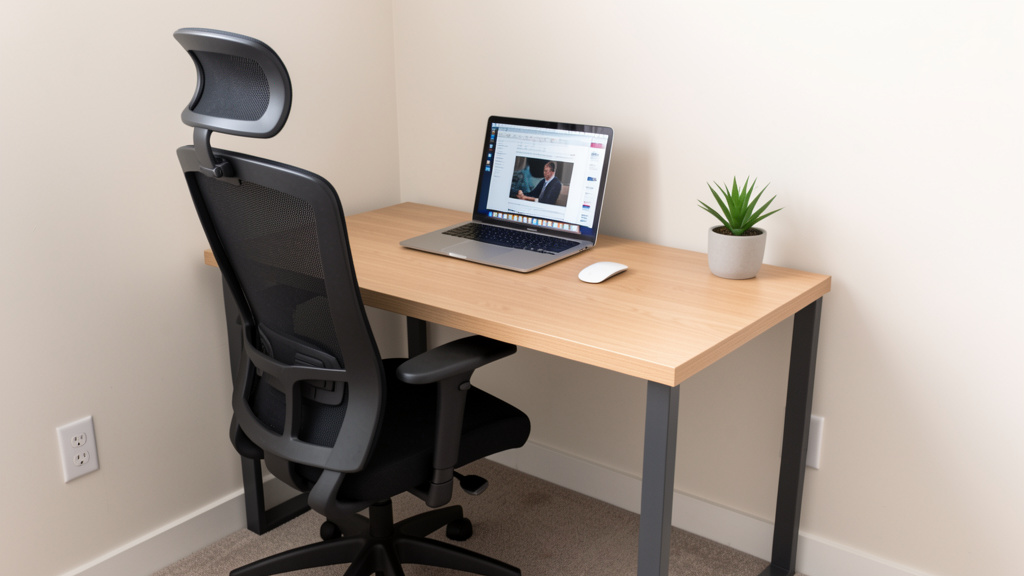
Step 2: Configure for Ergonomics and Flow (Building the Human-Centered Core)
With your survey data in hand, configuration focuses on positioning your body and essential tools to minimize strain and maximize efficiency. Ergonomics isn’t a luxury for large offices—it’s more critical in small spaces where poor posture or awkward reaches are amplified by confinement. The goal: create a “work envelope” where everything you need daily is within comfortable reach without twisting, stretching, or straining. We’ll use the evidence-based “Neutral Posture” model as our guide.
The Ergonomic Triad: Chair, Desk, Monitor
Chair First, Always: Your chair is foundational to physical well-being. In tight quarters, prioritize:
* Seat Depth: Should allow 2–4 fingers between the back of your knee and the seat edge. Critical for circulation. Many compact ergonomic chairs offer adjustable seat depth.
* Lumbar Support: Must contact the natural curve of your lower spine. Built-in adjustable support is ideal. Avoid chairs where the backrest is a single flat plane.
* Armrests: Should be height-adjustable so elbows rest at 90–110 degrees, shoulders relaxed. Crucial for small spaces: Look for chairs with narrow armrests or the ability to flip/armrests down to slide closer to the desk. Bulky armrests waste precious lateral space.
* Swivel & Casters: Essential for accessing items beside or slightly behind you without twisting your spine. Hard-floor casters (nylon) vs. carpet casters (rubber) matter for stability. Budget Tip: A high-quality kneeling chair or saddle stool can be excellent space-savers with strong ergonomic benefits for core engagement, but require an adjustment period. Emergency Fix: If using a non-ergonomic chair temporarily, use a rolled towel for lumbar support and ensure feet are flat on the floor (use a footrest—a sturdy box wrapped in fabric works).
Desk Height & Surface: Standard desk height is 28–30 inches. Your elbows should rest comfortably at 90–110 degrees when typing, shoulders relaxed. If your chair can’t adjust high enough, a footrest is non-negotiable. For taller users, an adjustable-height desk (sit-stand) is ideal but requires vertical clearance. Small Space Specifics:
* Depth is King: A desk only 24 inches deep can be highly functional if configured wisely. Place monitor at the very back edge. Keyboard/mouse on a pull-out tray (saves 4–6 inches of depth) or directly on the desk with arms resting comfortably. Avoid deep desks (30″+) in tiny rooms—they eat floor space and force you to lean forward.
* Shape Strategy: Rectangular desks maximize wall usage. L-shaped desks can work brilliantly in corners but require precise measurement to avoid creating a cramped, inaccessible “dead zone.” Floating desks (wall-mounted) free up floor space visually and physically. Ensure wall studs are located for secure mounting. Murphy desks (fold-down) are perfect for multi-use spaces but require robust hardware and clear wall space below when folded up.
Monitor Positioning (Critical for Neck Comfort): The top of your screen should be at or slightly below eye level. Looking down slightly is natural; craning your neck significantly is not. For laptop users: Elevate the screen. Use a dedicated laptop stand, sturdy books, or a monitor arm. Then connect an external keyboard and mouse. This adjustment is a key step in reducing the risk of chronic neck strain. Monitor arms are exceptionally* valuable in micro offices: they clamp to the desk edge, freeing up the entire desktop surface, allow infinite height/tilt/swivel adjustment, and can be swung out of the way when not in use. Ensure the arm’s clamp fits your desk thickness. Distance: Arm’s length away (approx. 20–30 inches). Too close causes eye strain; too far causes leaning.
Optimizing the Work Triangle: Keyboard, Mouse, Primary Tools
Imagine a triangle connecting your keyboard home position, mouse position, and the center of your monitor. This triangle should be compact. Your mouse should be close enough that you don’t have to reach forward or sideways excessively—elbow stays near your body. Vertical mice or trackballs can reduce shoulder strain and require less lateral desk space. Place your most-used items (notebook, pen cup, phone) within the “primary zone”—the area you can reach with a relaxed shoulder movement without leaning. Less-used items go to the “secondary zone” (requiring a slight lean) or “tertiary zone” (requiring standing up). In a tiny desk, this means ruthlessly curating what lives on the surface. A shallow tray organizer keeps essentials contained and portable.
Lighting Configuration: Layering for Function and Mood
Overhead lights alone create harsh shadows on your face (bad for video calls) and glare on screens. Implement layered lighting:
1. Ambient Light: Soft, overall illumination. Use existing room lights on a dimmer if possible, or add a small floor lamp with a warm-white bulb (2700K–3000K) in a corner to bounce light off walls.
2. Task Light: Focused light only where you need it—your desk surface. An adjustable-arm desk lamp is essential. Position it to the side opposite your writing hand (right-handed? lamp on left) to minimize shadows. Choose LED with adjustable color temperature (warmer for evening, cooler for morning focus) and brightness. Avoid placing it directly behind your monitor (causes screen glare) or directly in your line of sight.
3. Accent Light (Small Space Secret Weapon): A tiny LED strip light mounted under the desk front edge provides subtle upward glow. This reduces the “cave effect” of a dark desk underside, visually lightens the space, minimizes eye strain from stark contrast between bright screen and dark surroundings, and creates a professional halo effect on video calls. Battery-operated puck lights inside a closet-turned-office provide instant task lighting without wiring.
Why This Step is Crucial: Proper configuration helps prevent repetitive strain injuries and reduces micro-fatigue—those tiny energy drains from constant minor adjustments (reaching for the mouse, squinting at the screen) that accumulate and diminish focus. A well-configured micro office feels effortless to use. Common mistakes: Using a dining chair long-term (leads to discomfort), placing the monitor too low (causing neck strain), ignoring lighting layers (resulting in eye fatigue), and cramming too much on the desk surface (creating visual chaos). Remember: Ergonomics is personal. What works for one body won’t work for another. Your survey data guides your perfect setup. Take photos of your configured setup from your seated perspective. Does everything look accessible? Does the lighting feel comfortable on your eyes? Adjust iteratively.
The Fundamental Principle: In a constrained space, ergonomics isn’t about having the most equipment—it’s about the precise, intentional placement of the few essential elements to create a zone of effortless interaction between your body and your work.
Step 3: Adapt with Multi-Functional Solutions (The Art of Spatial Alchemy)
This is where small-space ingenuity shines. “Adapt” means selecting furniture, storage, and tools that serve multiple purposes, transform as needed, or disappear entirely. The goal is to increase functional capacity without increasing physical footprint. Think like an architect of efficiency.
Furniture That Transforms:
Desks: Beyond floating and Murphy desks, consider:
* Corner Desks with Hutch: Utilizes often-wasted corner space vertically. The hutch provides immediate storage for frequently used items (headset, notepad, charger), keeping the main desk surface clear.
* Desk + Shelf Combos: Integrated units where the desk surface flows into wall shelves. Creates a cohesive look and maximizes vertical storage directly above the work zone.
* Nesting Tables: Two small tables that tuck together. Use one as a permanent desk base, pull out the second for extra surface during intensive projects, then tuck it away.
* Drafting Tables: Angled surfaces are excellent for artists or anyone who reads physical documents frequently. Many fold flat against the wall when not in use.
Seating Beyond the Chair: A compact ottoman with storage inside holds blankets, files, or project supplies. It doubles as extra seating or a footrest. A sturdy storage bench at the end of a bed in a bedroom office provides seating, storage, and defines the workspace boundary.
Vertical Real Estate is Prime Real Estate: Walls are your most underutilized asset. Install:
* Floating Shelves: Use varying depths (6″, 8″, 10″) strategically. Shallow shelves for books/decor; deeper shelves for printers or project boxes. Anchor securely into studs. Style minimally—clutter on shelves makes the space feel smaller.
* Pegboards: The ultimate adaptable system. Mount a section behind or beside your desk. Use hooks, shelves, bins, and clips to hold everything: headphones, scissors, tape, notebooks, plants. Items are visible, accessible, and the board itself becomes a functional art piece. Easily reconfigured as needs change.
* Magnetic or Cork Boards: For pinning inspiration, to-do lists, or reminders. Magnetic paint applied to a wall section allows using magnets directly. Combine with a slim shelf below for pins and small tools.
* Over-Door Organizers:* Use on the back of a bedroom or closet office door for storing supplies in clear pockets—chargers, cables, sticky notes, pens. Keeps items contained and out of sight when the door is closed.
Storage Strategies for Minimal Footprint:
The “Zoning” Method: Divide storage into zones based on frequency of use:
* Zone 1 (Desk Surface): ONLY daily essentials (keyboard, mouse, one notebook, pen cup). Use a shallow tray to corral these.
* Zone 2 (Within Arm’s Reach): Items used several times a week (reference book, headset, current project folder). Utilize desk drawers, a small cart beside the desk, or the top floating shelf.
* Zone 3 (Step Away): Weekly/Monthly items (printer, extra paper, archived files). Place in a nearby closet, under-bed storage bin, or a slim cabinet against an adjacent wall.
* Zone 4 (Out of Sight): Rarely used items (tax records, old projects). Store in labeled bins in a basement, attic, or high closet shelf. Digitize what you can.
Containerization is Key: Uniform, labeled containers (bins, boxes, baskets) create visual calm. A stack of mismatched plastic tubs feels chaotic; a set of matching woven baskets on a shelf feels intentional and organized. Measure shelf dimensions before buying containers. Clear bins are great for visibility; opaque bins hide clutter. Label everything—saves time searching.
Furniture with Hidden Storage:* Choose a desk with a built-in drawer or cubby. Use a filing cabinet that doubles as a side table (add a piece of wood on top for a surface). A rolling cart is a micro-office powerhouse: tuck it under the desk when not needed, roll it out for extra surface, use its tiers for Zone 2 storage. Add casters to a small wooden crate for mobile storage.
Technology Adaptation: Go Wireless, Go Vertical
Cable Management Mastery: Cables are visual noise and tripping hazards. Strategies:
* Under-Desk Trays: Mount a simple mesh tray underneath the desk to hold power strips and excess cable length. Keeps them off the floor and contained.
* Sleeves & Ties: Use braided cable sleeves to bundle monitor, keyboard, and mouse cables into one neat tube. Velcro ties (reusable!) are superior to zip ties for adjustments. Adhesive cable clips route cables along desk legs or walls.
* Wireless Where Possible: Bluetooth keyboard/mouse eliminate two cables. A wireless charging pad for your phone reduces cord clutter. Caution: Don’t go wireless for critical items if reliability suffers (e.g., a wired Ethernet connection is often more stable than Wi-Fi for video calls).
* Label Ends: Use small adhesive labels or colored tape on cable ends (“Monitor,” “Laptop,” “Lamp”) to avoid the dreaded “unplug the wrong thing” moment.
Monitor Arms Revisited: Worth emphasizing again—they are transformative for small desks. Freeing up 12–18 inches of precious desktop depth is invaluable. Look for single or dual-monitor arms with gas-spring adjustment for smooth movement.
All-in-One Devices:* Consider an all-in-one printer/scanner/copier to save space versus separate units. Evaluate if you truly need printing capability at home—many services offer affordable local pickup.
Why This Step is Crucial: Adaptation turns spatial limitations into opportunities for clever, personalized design. It prevents the “clutter creep” that rapidly overwhelms small areas. A well-adapted space feels larger, more intentional, and less stressful because everything has a designated, efficient home. Common mistakes: Buying bulky furniture “on sale” that dominates the room, neglecting vertical space (leaving walls bare while floor is crowded), using open shelving without containers (creates visual chaos), and ignoring cable management (makes even a tidy desk look messy). Adaptation requires honesty: Does this item earn its place in my limited Zone 1 or 2? If not, it belongs in Zone 3 or 4, or not at all. Test solutions temporarily with painter’s tape on the floor/wall before committing to purchases or mounting hardware. Live with the layout for a day. Does the rolling cart block the door? Does the pegboard feel accessible? Iterate.
Step 4: Personalize for Motivation and Well-Being (The Soul of Your Space)
A sterile, purely functional micro office is draining. Personalization injects joy, reduces stress, and signals to your brain: “This is my professional space.” However, in tight quarters, personalization must be intentional to avoid clutter. This step is about curating elements that support your psychology, not accumulating knick-knacks.
Curating Visual Calm and Inspiration:
The Power of Color Psychology: Your wall color (or large accent) sets the tone. Small spaces benefit from light, cool colors (soft blues, greens, warm whites, light grays) which reflect light and create a sense of airiness. Avoid dark, saturated colors on large surfaces—they can feel cave-like. Accent strategically: A single vibrant artwork, a colorful desk organizer, or plants add life without overwhelming. For video calls, ensure your backdrop is neutral and uncluttered (a solid-colored wall, a neatly organized bookshelf section, or a simple fabric panel).
Biophilic Design (Nature Connection): Incorporating natural elements significantly reduces stress and boosts creativity. In a micro office, this is achievable:
* Plants: Choose low-light, low-maintenance varieties perfect for desks: Snake Plant (Sansevieria—purifies air, thrives on neglect), ZZ Plant (Zamioculcas—glossy leaves, tolerates low light), Pothos (trailing vine, grows in water or soil), or a small Peace Lily (beautiful white blooms, indicates when it needs water). Use a single, attractive pot. Avoid overcrowding with many tiny plants. A small desktop fountain adds soothing sound and humidity.
* Natural Materials: A wooden desk organizer, a cork bulletin board, a stone coaster for your mug, or a woven basket for storage introduce texture and warmth that synthetic materials lack.
* Views: If your window looks onto a brick wall, place a small mirror strategically to reflect light and create the illusion of a view. Position your desk to face the room or a pleasant interior view if the window view is undesirable.
Meaningful, Minimal Art:* One piece of art you genuinely love is more powerful than a gallery wall of clutter. Choose something that inspires focus (a serene landscape), creativity (an abstract piece), or calm (a simple line drawing). Keep frames consistent in style/color for cohesion. A small digital photo frame cycling through calming nature images or cherished memories can be a dynamic yet space-efficient touch.
Sensory Optimization Beyond Sight:
Soundscaping: Combat distracting noises with intentional sound.
* Noise-Canceling Headphones: Essential investment for focus in shared spaces. Over-ear models generally provide better isolation than earbuds. Use them not just for calls, but to play focus-enhancing soundscapes: white noise, brown noise (deeper, more rumbly—excellent for masking voices), nature sounds (rain, forest), or instrumental music (lo-fi hip hop, classical, ambient). Apps like Noisli or MyNoise offer customizable mixes.
* Acoustic Panels: Small, decorative fabric-wrapped panels can be mounted on walls to absorb echo and reduce noise transmission. They come in various colors/patterns and can look like modern art. Place them on the wall opposite your main noise source or where sound bounces most.
* Strategic Soft Furnishings: A small area rug (even 2’×3′) under your chair absorbs sound and defines the space. Heavy curtains on windows block street noise and add warmth. A fabric pinboard also acts as a minor sound absorber.
Scent and Air Quality: Stale, stuffy air kills concentration. Ensure good ventilation—open a window periodically if possible. A small desktop air purifier with a HEPA filter improves air quality, especially important if allergies are a concern. Use scent sparingly and intentionally: a single essential oil diffuser with lavender (calming) or peppermint (energizing) during specific work blocks, or a naturally scented soy candle (lit only when you are present and attentive). Avoid overpowering synthetic fragrances. A small dish of coffee beans can neutralize odors.
Ritual and Boundary Setting (Psychological Personalization):
Your micro office exists within your home. Clear rituals signal transitions between “home mode” and “work mode,” protecting your mental well-being.
The Start-of-Work Ritual: 5 minutes before “clocking in”: Wipe down the desk surface, fill your water bottle, brew tea/coffee, review your top 3 tasks for the day, put on your focus playlist. This physically and mentally prepares the space and your mind.
The End-of-Work Ritual: Equally critical. Shut down computer, tidy desk to “reset” state (return items to trays/zones), review completed tasks, plan tomorrow’s top 3, put away work materials if in a multi-use space (close Murphy desk, tuck rolling cart). This creates psychological closure, preventing work from bleeding into personal time—a major risk when your office is always visible.
Visual Boundaries in Shared Spaces:* If your desk is in a living area, use a room divider (a folding screen, a tall plant, a bookshelf placed perpendicular to the wall) to create a subtle visual barrier. When you sit at the desk, you are “at work”; when you step around the divider, you are “at home.” Communicate these boundaries with household members.
Why This Step is Crucial: Personalization addresses the human need for autonomy, competence, and relatedness. A space that feels authentically yours, supports your senses, and respects your psychological boundaries reduces burnout risk and increases intrinsic motivation. It transforms the space from a mere workstation into a sanctuary for productivity. Common mistakes: Over-personalizing with too many photos/objects (creates visual clutter), using strong scents that bother others, neglecting sound management (leading to constant distraction), and skipping transition rituals (blurring work-life boundaries). Personalization is deeply individual. What calms one person (minimalist white space) might stress another (who needs vibrant color). Reflect on what genuinely makes you feel focused, calm, and capable. Start with one or two intentional elements—a plant and a specific playlist—and observe their impact before adding more.
Step 5: Evolve Through Iteration and Feedback (The Living System)
Your micro office is not a static project to be “completed.” It is a living system that must adapt to changing projects, seasons, household dynamics, and your own evolving needs. The “Evolve” phase builds in mechanisms for continuous improvement, preventing stagnation and frustration.
Implementing Feedback Loops:
The Weekly 10-Minute Tune-Up: Schedule it like a meeting. Each Friday (or Sunday evening), spend 10 minutes:
1. Tidy: Reset the space to its ideal state (Zone 1 clear, cables neat).
2. Reflect: Ask: “What worked well this week? What caused friction?” (e.g., “I kept reaching for my water bottle and knocking over my pen cup,” “The afternoon sun glare on my screen was unbearable Tuesday”).
3. Adjust: Make one tiny change based on reflection. Move the water bottle to the left side of the desk. Order a monitor hood or plan to close the blind at 2 PM. Small, frequent adjustments prevent major overhauls later.
The Quarterly Deep Review: Every three months, revisit your original Survey notes. Has your work type shifted? (e.g., More video calls now?) Has household traffic changed? Are new pain points emerging? (e.g., Wrist discomfort?) This is the time for larger adaptations: trying a new ergonomic accessory, reconfiguring shelf storage, testing a different lighting setup. Take “before” and “after” photos to track progress and maintain motivation.
Listen to Your Body:* Your body provides the most honest feedback. Persistent neck ache? Re-check monitor height. Shoulder tension? Evaluate mouse position and chair armrests. Eye strain? Assess lighting layers and screen brightness. Don’t ignore these signals. Address them immediately with targeted adjustments. Consider setting a timer to prompt posture checks or micro-breaks (stand up, stretch, look at something 20 feet away for 20 seconds every 20 minutes— the 20-20-20 rule).
Planning for Change:
Project-Based Adaptation: For a short-term intensive project requiring different tools (e.g., building a physical prototype), create a “Project Kit.” A dedicated bin holds all project-specific supplies. During the project, temporarily reconfigure your Zone 2 storage to accommodate the kit. When the project ends, the kit is sealed and stored in Zone 3 or 4, and your standard setup is restored. This prevents project clutter from permanently occupying your core workspace.
Seasonal Shifts: Acknowledge how seasons affect your space. In winter, you might need warmer lighting or a small space heater (safely placed!). In summer, a small desk fan might be essential. Adjust window coverings for changing sun angles. Rotate seasonal decor minimally (e.g., a small bowl of pinecones in winter, a single sunflower in summer) to keep the space feeling fresh without clutter.
Life Stage Transitions:* Anticipate changes. If a new family member is arriving, how will noise levels change? Plan acoustic adaptations early. If you anticipate taking on a collaborator occasionally, identify where a second chair could temporarily fit. Building flexibility into your initial Adapt phase (e.g., choosing furniture on casters, leaving one shelf intentionally empty) makes future evolution smoother.
Why This Step is Crucial: Evolution prevents the “set it and forget it” trap that leads to outdated, inefficient spaces. It fosters a mindset of proactive problem-solving rather than reactive frustration. Recognizing that your needs will change reduces the pressure to create a “perfect” permanent solution on day one. It empowers you to be the ongoing curator of your environment. Common mistakes: Ignoring minor annoyances until they become major problems, resisting change due to sunk cost (“I spent so much on this desk, I can’t move it!”), and failing to involve household members in feedback (“Does the new divider help you know when I’m in a meeting?”). Embrace imperfection. Your micro office is a work in progress, just like your career. Celebrate small improvements. The goal isn’t a magazine-perfect photo; it’s a space that consistently supports your best work and well-being. Document your tweaks in a notes app—seeing how far you’ve come reinforces the value of the process.
Deep Dive: Ergonomics in Tight Quarters—Beyond the Basics
While Step 2 covered core configuration, micro-office ergonomics demand nuanced attention to often-overlooked details where space constraints amplify risk. Let’s dissect critical areas with surgical precision.
The Footrest Imperative (Often Ignored): If your feet don’t rest flat on the floor with thighs parallel to the floor (or slightly sloping down), a footrest is non-optional. Dangling feet restrict blood flow, cause leg numbness, and force compensatory postures in the lower back. In tight spaces, choose wisely:
Adjustable Height Footrests: Allow fine-tuning as you shift positions. Look for models with a gentle rocking motion to encourage subtle movement and circulation.
Space-Saving Designs: A simple, sturdy wooden box wrapped in non-slip fabric is highly effective and tucks neatly under most desks. Avoid bulky, fixed-height footrests that dominate the limited legroom area. Measure the clearance under your desk before purchasing. The footrest should allow your knees to be at or slightly below hip level when seated.
Wrist and Hand Health: The Keyboard/Mouse Zone
Keyboard Tilt: Many keyboards have flip-out feet. Keep them DOWN. A negative tilt (front slightly higher than back) or flat position promotes a neutral wrist angle. Positive tilt (back higher) forces wrists into extension, straining tendons. If your desk is too high, lowering the chair and using a footrest is better than tilting the keyboard up.
Mouse Pad with Wrist Support: Use a thin, memory foam or gel wrist rest only for resting between mousing actions, not while actively using the mouse. Thick, bulky rests can elevate the wrist unnaturally. The mouse surface itself should be at the same height as the keyboard space bar.
Alternative Input Devices: In extremely confined desk spaces:
* Trackball: Requires minimal hand movement; the ball is manipulated by thumb or fingers. Excellent for reducing shoulder strain from reaching.
* Vertical Mouse: Positions the hand in a neutral “handshake” posture, reducing forearm pronation (palm-down strain). Can take 1–2 weeks to adapt but offers significant long-term benefit for strain prevention.
* Touchpad:* Using your laptop’s touchpad (if external keyboard is used) eliminates the need for a separate mouse surface entirely. Enable tap-to-click and customize sensitivity for efficiency.
Vision Ergonomics: Protecting Your Most Critical Tool
Screen Settings: Beyond positioning, optimize your display. Increase text size to avoid squinting. Use dark mode or night light settings (reducing blue light) during evening hours to minimize eye strain and support circadian rhythm. Ensure screen brightness matches ambient light—too bright in a dim room causes strain; too dim in a bright room causes glare.
The 20-20-20 Rule: Every 20 minutes, look at something at least 20 feet away for 20 seconds. This relaxes the eye’s focusing muscle. Set a subtle timer or use apps like Time Out (Mac) or EyeLeo (Windows) to prompt you. In a small room, “20 feet” might be looking out the window at a distant tree or across the room to a poster on the far wall. The key is shifting focus to a distant point.
Anti-Glare Screen Protector:* If window glare persists despite positioning adjustments, a matte screen protector significantly reduces reflections without drastically altering color accuracy (important for designers). Test before permanent application.
Movement is Medicine: Combating Static Posture
Sitting perfectly ergonomically for hours straight is still harmful. The human body is designed for movement. Integrate micro-movements:
Chair-Based Stretches: While seated: Chin tucks (gently draw chin straight back), shoulder blade squeezes (hold 5 seconds, release), ankle circles, wrist flexor/extensor stretches. Do these during phone calls or while thinking.
Standing Breaks: Set a timer for every 30–45 minutes. Stand up for 2–3 minutes. Walk to get water, stretch arms overhead, do a few calf raises. If you have a sit-stand desk, alternate sitting and standing every 30–60 minutes. Start with short standing periods (15 mins) to build tolerance. Small Space Tip: Place your water bottle or frequently used reference book on a high shelf across the room. Retrieving it forces a standing break and a few steps.
Active Seating Options (Use Judiciously): A stability ball chair engages core muscles but requires strong core stability and isn’t suitable for all-day use or those with back issues. A saddle stool promotes an open hip angle (good for circulation) but may not provide adequate lumbar support for long periods. These are best used in rotation* with a primary ergonomic chair, not as a full replacement, especially in constrained spaces where stability is key.
When Professional Help is Warranted: If you experience persistent pain (numbness, tingling, sharp pain) despite ergonomic adjustments, consult a healthcare professional—occupational therapist, physical therapist, or ergonomics specialist. Many offer virtual assessments where you share photos/video of your setup. Early intervention prevents chronic issues. Document your setup details (chair model, desk height, monitor distance) to share with them. This proactive step is a sign of professionalism and self-care.
Storage Solutions That Maximize Every Inch—A Tactical Guide
Storage in a micro office isn’t just about capacity; it’s about intelligent accessibility and visual management. Let’s move beyond generic “use shelves” advice to specific, actionable strategies categorized by space type and constraint.
The Closet Office Conversion: A Complete Blueprint
Converting a reach-in closet (minimum 24″ deep × 36″ wide) is a brilliant micro-office solution. Here’s a precise implementation plan:
1. Clear & Clean: Remove all contents. Clean thoroughly. Patch any holes.
2. Lighting is Non-Negotiable: Install battery-operated LED puck lights (3–4) on the closet ceiling or top shelf. Use warm white (2700K). Place the switch near the door opening for easy access. Alternative: Run a low-voltage LED strip light powered by a USB adapter plugged into your desk power strip—no wiring needed.
3. Desk Surface: Install a sturdy floating desk shelf. Depth: 20–22 inches (maximizes knee space). Width: Full closet width minus 1–2 inches for clearance. Mount securely into wall studs using heavy-duty brackets. Critical: Ensure the shelf height allows comfortable seated knee clearance (approx. 24–26″ from floor to underside of shelf). Test with your chair before final mounting.
4. Vertical Storage: Install adjustable shelf pins on the side walls. Use shallow shelves (8–10″ deep) above the desk for Zone 2 items (headset, notebook, current project). Reserve the top shelf (if height allows) for Zone 3 items (printer, supplies). Use uniform bins/baskets.
5. Door Utilization: Mount a pegboard panel on the inside of the closet door. When closed, it’s hidden; when open, it provides immediate access to frequently used tools. Alternatively, use an over-door organizer with clear pockets for small supplies.
6. Power Solution: Run an extension cord safely from the nearest outlet (use cord covers along the baseboard) to a power strip mounted underneath the desk shelf. Ensure cords are secured and not a tripping hazard. Best Practice: Consult a qualified electrician about adding a dedicated outlet inside the closet if feasible and permitted by local regulations.
7. Finishing Touches: Paint the interior a light, reflective color. Add a small, removable rug. Install a hook on the inside of the door for headphones. When not in use, close the door—the office vanishes completely. This solution is ideal for bedrooms or hallways where visual separation is paramount.
The Corner Nook Optimization
Corners are often awkward, but with the right furniture, they become highly efficient:
Desk Choice: A true corner desk (triangular or curved front) is superior to pushing a rectangular desk into the corner. It eliminates the inaccessible “dead zone” and provides continuous workspace along both walls. Measure the corner angle—most are 90 degrees, but verify.
Monitor Placement: Place the primary monitor centered on the corner point. Secondary monitors or reference materials go on the wings. A dual-monitor arm mounted at the corner apex provides maximum flexibility.
Storage Integration: Choose a corner desk unit with built-in hutches or shelves wrapping around the corner. If using a floating shelf desk, install floating shelves on both adjacent walls, starting just above desk height. Use the shelves closest to the desk for Zone 2 items.
Lighting Strategy: Avoid a single overhead light which casts shadows. Use two adjustable desk lamps (one on each “wing” of the desk) or a single swing-arm lamp mounted on the wall at the corner point. Supplement with ambient light from the room.
Under-Stair and Alcove Exploitation
These uniquely shaped spaces require custom thinking:
Measure Meticulously: Create a detailed template (use craft paper) of the alcove shape, noting every curve, slope, and obstruction (pipes, vents). Take this template when shopping for furniture or discussing with a professional.
Custom Shelving: Often the best solution. Simple, open shelving units built to fit the exact dimensions maximize every cubic inch. Leave the bottom section open for chair clearance. Paint shelves the same color as the walls to make them recede visually.
Rolling Cart Advantage: A narrow rolling cart (12–14″ wide) can be tucked into irregular spaces. Its mobility allows you to pull it out for use and push it back flush when not needed, adapting to the alcove’s constraints.
Seating Consideration: In very tight alcoves, a compact drafting stool (without arms) may be more practical than a standard office chair, allowing easier entry/exit.
The “No Dedicated Space” Reality: Mobile & Disappearing Solutions
If you lack even a closet or corner, your office must be truly portable and vanish completely:
The Lap Desk Ecosystem: Invest in a high-quality, large lap desk (minimum 18″×12″) with a wrist rest and device slot. Pair it with:
* A dedicated, attractive storage bin (Zone 3) that holds everything: lap desk, external keyboard/mouse (compact Bluetooth models), headset, notebook, charger. This is your “Office-in-a-Box.”
* A specific location for the bin: a designated shelf in a closet, under the bed in a storage container, or a specific spot in a hall cabinet.
* A ritual: Retrieve the bin, set up at the kitchen table or living room sofa only during work hours. At day’s end, pack everything back into the bin and return it to its home. This physical act reinforces work-life boundaries.
Fold-Down Wall Desk (Murphy Desk Lite): For renters or those avoiding major installation, seek out pre-fabricated fold-down desks designed for easy mounting. Ensure the mounting hardware is robust and hits studs. The desk surface should lock securely in the down position. When folded up, it’s barely noticeable. Ideal for a hallway wall or beside a bed.
Strategic Public Space Use: If home space is truly impossible, identify consistent external locations: a specific library carrel, a quiet corner of a coffee shop with reliable Wi-Fi and power outlets, a co-working day pass. The key is consistency*—using the same spot builds routine. Equip a dedicated backpack with all work essentials to minimize setup/breakdown time.
Storage Container Deep Dive: Choosing Wisely
Material Matters:
* Woven Seagrass/Rattan: Aesthetically warm, breathable, hides contents. Best for Zone 2/3 on open shelves. Ensure tight weave to prevent small items falling through.
* Fabric Bins (with stiff sides): Lightweight, collapsible for storage when not in use, wide range of colors/patterns. Look for reinforced handles. Ideal for shelves and carts.
* Acrylic/Plastic: Modern look, contents visible. Choose frosted or tinted options to reduce visual clutter. Ensure edges are smooth. Good for desk organizers.
* Cardboard (Reinforced): Budget-friendly, recyclable. Best for temporary storage or Zone 4. Line with contact paper for durability if desired.
Labeling Systems: Handwritten labels on masking tape feel temporary. For permanence: printable label maker tags, custom vinyl stickers, or chalkboard paint/stickers on containers. Label contents, not just “Office Supplies.” Be specific: “Client Notes Q3,” “Printer Paper,” “USB Cables.” This saves immense time searching.
The “One In, One Out” Rule:* To prevent storage from overflowing, adopt this rule strictly. When you acquire a new supply (a new notebook, a cable), remove an old, unused item from the same container. This maintains equilibrium and forces regular curation.
Technology and Cable Management for Clutter-Free Focus
Technology enables remote work but introduces significant visual and physical clutter. Mastering this domain is essential for a serene micro office. Let’s dissect solutions with precision.
Power Management: The Hidden Backbone
Under-Desk Power Hub: This is the cornerstone of clean power. Mount a power strip with USB ports underneath the desk surface using heavy-duty adhesive strips or dedicated mounting brackets (ensure desk material can support it—particle board may require reinforcement). Route all device cables down through a grommet hole (if desk has one) or along the desk leg using clips. Benefits: Outlets are instantly accessible without bending down; cords are contained; reduces tripping hazard; creates a clean visual line on the desk surface. Choose a surge-protected strip. For sit-stand desks, use a retractable power cord reel mounted under the desk to manage cable slack during height changes.
Wireless Charging Station: A single Qi-certified charging pad eliminates the cable for your phone. Place it in your primary zone. For multiple devices (phone, earbuds, smartwatch), a multi-device charging stand keeps them organized and charged in one spot. Ensure compatibility with your devices.
Battery Management:* Designate a small container (a ceramic dish, a specific bin) solely for charging cables and portable power banks. When not in use, cables live here. Avoid leaving chargers plugged in at outlets unnecessarily—they draw “vampire power” and create visual noise. Use smart plugs for devices like printers or lamps that you only need during work hours; schedule them to turn off automatically after your workday ends.
Cable Management: A Step-by-Step Protocol
1. Audit & Purge: Unplug everything. Identify each cable. Discard frayed, damaged, or obsolete cables (old printer cables, proprietary chargers for retired devices). Keep only what is essential today.
2. Label Immediately: Before reconnecting, label both ends of every cable with small, durable labels (heat-shrink labels are best; colored tape works). “Monitor,” “Laptop Charger,” “Desk Lamp,” “Ethernet.” This saves hours of frustration later.
3. Bundle Strategically: Group cables that run the same path. Use reusable Velcro cable ties (avoid zip ties—they are permanent and hard to adjust). Bundle tightly but not so tight it damages insulation. For the main bundle running from under-desk power hub to devices, use a braided nylon sleeve for a clean, professional look.
4. Route Purposefully:
* Vertical Runs (Desk Leg to Floor): Use adhesive cable clips or spiral wrap to secure the bundle neatly along one desk leg. Choose the leg farthest from your sitting position for minimal visibility.
* Horizontal Runs (Under Desk): Use under-desk cable trays or adhesive-backed channels to keep bundles flat and out of the way of your knees.
* Wall Runs: If cables must travel up a wall (e.g., to a monitor arm mount), use flat, paintable cable concealers that stick to the wall. Match the color to your wall for near-invisibility.
5. Manage Slack: Excess cable length is the enemy of tidiness. Use cable reels, velcro ties to create neat loops, or wrap slack around a dedicated cable management box mounted under the desk. Avoid dangling loops.
6. Final Check: Sit in your chair. Look at the desk from your normal working position. Are cables visible? Do any create visual distraction? Adjust routing until the view is clean. The goal is that from your seated perspective, the desk surface appears almost cable-free.
Network Optimization for Reliability
Wired Ethernet > Wi-Fi: For video calls, large file uploads, or latency-sensitive work (design, coding), a wired Ethernet connection is vastly more stable and faster than Wi-Fi. In a micro office, run a single, high-quality Cat 6 cable from your router to your desk. Conceal it along baseboards using cord covers. Connect it to a small, unmanaged network switch under your desk if you have multiple wired devices (desktop PC, VoIP phone). The initial setup effort pays dividends in reduced dropped calls and frustration.
Wi-Fi Enhancement: If wired isn’t feasible:
* Position Router Strategically: Place your main router centrally in the home, elevated, away from metal objects, microwaves, and cordless phone bases. Avoid placing it in a closet or basement corner.
* Wi-Fi Extender/ Mesh System: For dead zones, a mesh Wi-Fi system provides seamless coverage throughout the home. Place a satellite node relatively close to your micro office location. Avoid cheap, single-band extenders which often degrade performance.
* 5GHz Band: Connect your work devices to the 5GHz Wi-Fi band (if your router broadcasts separate SSIDs). It’s faster and less congested than the 2.4GHz band (used by smart home devices, older gadgets), though range is slightly shorter. Ideal for a fixed desk location.
Peripheral Selection for Space Efficiency
Compact Keyboard: Tenkeyless (TKL) keyboards omit the numeric keypad, saving 3–4 inches of desk depth. Ideal for most users who rarely use the numpad. Consider even smaller 60% or 75% layouts if you are comfortable with function-layer shortcuts (research required).
All-in-One Monitor: For desktop users, an all-in-one PC eliminates the CPU tower, freeing significant floor and desk space. Ensure repairability and upgrade paths are considered if longevity is a concern.
Document Camera vs. Scanner: For occasional document digitization, a high-resolution smartphone with a document scanning app (Adobe Scan, Microsoft Lens) is often sufficient. For frequent scanning, a compact sheet-fed scanner is far smaller than a flatbed scanner and automates the process. Store it in Zone 3 and bring it out only when needed.
Cloud Storage Strategy: Minimize the need for external hard drives on your desk. Implement a robust cloud backup system for active files. Use external drives only for offline archival backups, stored securely in Zone 4. Label drives clearly (“Archive 2023,” “Photo Backup”).
Psychological Strategies: Designing for Concentration and Calm
The physical setup is only half the battle. In tight quarters, psychological friction—distractions, mental clutter, blurred boundaries—can significantly impact productivity. This section provides evidence-based cognitive and behavioral tools.
Taming Distractions: A Layered Defense System
Environmental Distraction Audit: Revisit your Survey notes. Categorize distractions:
* Visual: Household activity in your line of sight, clutter on your desk, notifications on screen.
* Auditory: Conversations, TV, traffic, appliance noises.
* Digital: Email pings, Slack messages, social media notifications.
* Internal: Mind wandering, anxiety about household tasks, hunger.
Layered Countermeasures:
* Layer 1 (Prevention): Position desk away from high-traffic sightlines. Use a room divider or strategic furniture placement. Close the door if possible. Communicate work hours and “do not disturb” signals (e.g., red light on door, headphones on = busy) with household members. Schedule focused work blocks during naturally quieter household times.
* Layer 2 (Blocking): Noise-canceling headphones with brown noise or focus music. Website blockers (Freedom, Cold Turkey) during deep work sessions. Turn off non-essential notifications on all devices. Use “Do Not Disturb” mode on your phone and computer.
* Layer 3 (Management): Keep a “Distraction Pad” (small notepad) beside your desk. When an intrusive thought arises (“Need to text mom,” “Order cat food”), jot it down immediately and return to work. Review the pad during a scheduled break. This validates the thought without derailing focus. The Pomodoro Technique (25 minutes focused work, 5-minute break) builds distraction resistance gradually.
Cognitive Load Reduction: Minimizing Decision Fatigue
A cluttered space increases cognitive load—the mental energy required to process your environment. Reduce it systematically:
The “Reset” State: Define exactly what “tidy” looks like for your desk at the end of each day (e.g., “Keyboard centered, mouse in tray, one notebook open to today’s page, all pens in cup, trash emptied”). Photograph this ideal state. Use it as your nightly reset goal. Starting each day with a clean slate reduces morning decision fatigue.
Batching Administrative Tasks: Designate specific times for email, scheduling, and admin work (e.g., 10:30 AM and 3:30 PM). Close email and messaging apps outside these windows. This prevents constant context-switching, which can significantly reduce productive time.
Visual Task Management: Instead of a mental to-do list (which creates anxiety), use a physical system visible but contained:
* Small Whiteboard: Mounted on wall or standing on desk. Write top 3 daily priorities. Erase and rewrite each morning.
* Index Card System: One card per project. Keep current project card on desk; archive others in a small box. Flip the card over for notes.
* Digital Minimalism:* If using a digital task app, use a single, clean view. Avoid complex tagging systems that become maintenance burdens. The goal is frictionless capture and review.
Mindset Shifts for Spatial Constraints
Reframe “Small”: Instead of “cramped,” think “curated,” “efficient,” “intentional.” Language shapes perception. Your space isn’t lacking; it’s optimized. Celebrate the efficiency gains constraints force—less cleaning, less organizing, fewer distractions from excess stuff.
Focus on Proximity, Not Size: In a micro office, everything you need is close. No walking to a filing cabinet across the room. No searching for a pen in a deep drawer. This proximity, when organized well, saves cumulative minutes each day. Acknowledge this benefit.
Embrace Impermanence:* If your space is temporary (e.g., until you move), release the pressure for perfection. Focus on functional adequacy. Use removable solutions (Command strips, freestanding furniture). This reduces anxiety about “getting it exactly right.”
The Power of Micro-Rituals for Transition
As mentioned in Personalization, rituals are psychological anchors. Deepen them:
Pre-Work Ritual (5 mins): Light a specific candle (scented only if it aids focus for you), pour a glass of water, review daily priorities, take three deep breaths. This signals “work mode” to your brain.
Post-Work Ritual (5 mins): Shut down computer, tidy desk to reset state, write down one accomplishment from the day, extinguish candle, stretch. This creates closure. Critical for multi-use spaces: Physically alter the space. Close the Murphy desk. Tuck the rolling cart away. Drape a beautiful cloth over the desk surface. This visual change powerfully signals the end of work.
Midday Reset (2 mins): At lunch break, step away* from the desk completely. Eat in another room. Look out a window at nature. This mental separation prevents afternoon fatigue. Return to your desk only when ready to resume work.
Mastering Multi-Use Spaces: When Your Office Shares a Room
This is the reality for most micro-office dwellers. Success hinges on seamless integration and clear boundaries. Let’s address specific shared-space scenarios with tailored tactics.
Bedroom Office: Preserving Sanctuary
The bedroom should primarily support rest. An office here risks blurring work-sleep boundaries.
Physical Separation is Paramount:
* Room Divider: A folding screen, a tall bookshelf (filled with books facing the bed, office supplies facing the desk), or a curtain rod with a heavy fabric drape creates a visual barrier. Close it at the end of the workday.
* Strategic Furniture Placement: Position the desk so you are not facing the bed while working. Ideally, place it perpendicular to the bed or in a closet nook. Avoid having the bed directly in your line of sight during work hours.
* The “Closet Office” Solution: As detailed earlier, converting a closet is often the best bedroom office solution. It contains the work environment completely. Close the door, and the office vanishes.
Psychological Separation Tactics:
* Strict Hours: Define work hours and adhere to them rigidly. When work ends, perform your end-of-work ritual and close the divider/door. Do not check email from bed.
* Lighting Cues: Use your desk lamp only during work hours. In the evening, rely on softer bedside or ambient room lighting. This reinforces the space’s changing purpose.
* Scent Association: Use a specific, mild essential oil (like lemon or rosemary) only during work hours via a diffuser. At night, switch to lavender or chamomile for relaxation. Scent is a powerful psychological trigger.
Critical Avoidance: Never work in* bed. This strongly associates the bed with wakefulness and work stress, undermining its primary purpose. If you must review something briefly, sit at the edge of the bed with feet on the floor, not reclining.
Living Room / Family Room Office: Navigating Shared Life
This space demands respect for others’ needs and activities.
Define the Zone Clearly:
* Rug as Boundary: Place a distinct area rug (different color/pattern from main room rug) under your desk and chair. This visually defines “office territory.”
* Furniture as Anchor: Position your desk perpendicular to the main traffic flow, not blocking pathways. Use a small bookshelf or plant behind the chair to create a subtle back boundary.
* Vertical Markers: A tall floor plant (like a Fiddle Leaf Fig) or a narrow shelving unit beside the desk reinforces the zone without blocking light or sightlines.
Communication and Collaboration:
* Family Meeting: Discuss the setup with household members. Explain your work hours, the meaning of visual cues (headphones on = busy, but emergency exceptions), and how they can support you (e.g., “Please use the kitchen table for crafts during my 10 AM call”).
* Shared Calendar: Maintain a visible shared calendar (physical or digital) marking important meetings or deep focus blocks where interruptions should be minimized.
* Designated “Interruption” Signal: Agree on a non-verbal signal for urgent needs (e.g., a specific colored sticky note on your monitor means “I need you when you have a moment”).
Visual Discretion:* Keep the desk surface exceptionally tidy. At the end of the workday, stow visible work items in drawers or a closed cart. A closed laptop lid is a stronger “off-duty” signal than an open screen. Consider a decorative box to hold daily essentials (notebook, pens) that can be closed and stored on a shelf.
Kitchen / Dining Nook Office: Managing Transitions
Kitchens are high-traffic, multi-sensory environments. Challenges include noise, smells, and constant activity.
Timing Strategy: Schedule focused, deep work during naturally quieter kitchen times (early morning before household wakes, late evening). Reserve communication-heavy or less intensive tasks for busier periods.
Portable Setup Protocol: If using the dining table:
* Dedicated Cart: Keep all office supplies in a rolling cart stored nearby (pantry, adjacent hallway). Roll it out only during work blocks. Pack everything away immediately after.
* Surface Protection: Always use a desk pad or large tray to protect the table surface and contain your workspace. This makes cleanup instantaneous.
* Clear Agreement: Establish a household rule: “When the office tray is on the table, it is a workspace. Please clear dishes around it; do not place items on the tray.” Respect the space during work hours; restore the table fully afterward.
Minimize Sensory Conflict:* Avoid working during loud cooking activities (blender, food processor) or strong-smelling cooking if it distracts you. Use noise-canceling headphones proactively. Position yourself away from the stove/sink if possible.
The Universal Multi-Use Rule: Respect the Primary Function
Always prioritize the room’s main purpose. The office is a guest in the bedroom, living room, or kitchen. Design your setup to be respectful, reversible, and non-intrusive. When not in active use, the space should revert seamlessly to its primary function for the household. This mindset fosters harmony and reduces resentment. Regularly solicit feedback from others sharing the space: “How is the desk placement working for you? Does the lighting bother you in the evening?” Adapt collaboratively.
Budget-Conscious Paths: Building Your Micro Office at Every Price Point
Creating an effective micro office is achievable at any budget. The key is strategic prioritization—investing in foundational elements that impact health and core function first, then enhancing over time. Let’s break down realistic pathways.
The Essential Foundation Tier ($0 – $150): Prioritizing Health & Function
Philosophy: “Fix the critical flaws first. Use what you have creatively. Health is non-negotiable.”
Chair: Search Facebook Marketplace, Nextdoor, or local thrift stores for used ergonomic chairs (Herman Miller Aeron, Steelcase Leap—often available for $50–$150). Test for lumbar support and adjustability. If absolutely no budget: Use your best dining chair. Add a rolled towel or small pillow for lumbar support. Ensure feet are flat on floor (use stacked books as a footrest). Set a timer to stand/stretch every 20 minutes.
Desk: Repurpose existing furniture. A sturdy console table (often 14–18″ deep—perfect for small spaces), a cleared section of a bookshelf, or even a well-supported folding table. Ensure height is appropriate (elbows at 90 degrees). Sand and paint for a fresh look if desired.
Monitor Height: Elevate laptop with sturdy books, a wooden crate, or a DIY stand made from scrap wood. Must use external keyboard and mouse (thrift stores, old spares). This is the single most impactful ergonomic fix for minimal cost.
Lighting: Reposition an existing desk lamp. Use a clamp light with a warm LED bulb ($10) mounted on a shelf edge. Maximize natural light.
Storage: Repurpose shoeboxes, oatmeal containers, or mason jars for desk organization. Use painter’s tape to label. Install a single $5 Command hook for headphones.
Cable Management: Use old bread ties, hair ties, or twist ties to bundle cables. Route along desk leg with masking tape (removable).
Key Principle: Focus on ergonomics (monitor height, chair support) and reducing visual clutter (containment with boxes). Accept imperfection. This tier establishes a functional, healthy baseline. Track pain points to guide future upgrades.
The Optimized Efficiency Tier ($150 – $500): Strategic Upgrades for Flow
Philosophy: “Invest in solutions that save daily time, reduce friction, and enhance well-being. Prioritize versatility.”
Chair: Upgrade to a new budget-friendly ergonomic chair with adjustable height, lumbar support, and tilt (e.g., Hbada, Branch Furniture—often $150–$300 on sale). This is the #1 upgrade for long-term health.
Desk: Invest in a purpose-built solution: a wall-mounted floating desk kit ($100–$250) to free floor space, or a compact standing desk converter ($150–$300) that sits on your existing desk, allowing sit/stand flexibility without replacing the whole desk.
Monitor Arm: A single-monitor arm ($50–$150) frees significant desk space and enables perfect ergonomic positioning. Game-changer for small desks.
Lighting: Add a quality adjustable LED desk lamp with color temperature control ($30–$80). Implement the under-desk LED strip ($15) for ambient glow.
Storage: Install a pegboard system ($40–$100) for highly adaptable, visible storage. Add a narrow rolling cart ($30–$60) for mobile Zone 2 storage.
Cable Management: Purchase an under-desk cable management tray ($20) and braided sleeves ($10).
Key Principle: Each purchase solves a specific, documented friction point from your Survey or Weekly Tune-Up. Avoid “nice-to-haves.” This tier transforms functionality and daily experience significantly.
The Premium Sanctuary Tier ($500+): Curated Excellence & Longevity
Philosophy: “Invest in heirloom-quality, highly personalized solutions that maximize well-being, aesthetics, and seamless integration. Prioritize sustainability and joy.”
Chair: Invest in a top-tier ergonomic chair (Herman Miller, Steelcase) with full adjustability and premium materials. Consider professional fitting if available. This is a long-term investment in your health.
Desk: Commission a custom floating desk built to exact dimensions of your space, using sustainable materials (reclaimed wood, bamboo). Or invest in a high-quality electric sit-stand desk (Uplift, Fully) with memory presets.
Integrated Systems: Professional installation of built-in shelving, concealed cable management channels within walls/floors (requires electrician), acoustic panels custom-printed with art.
Technology: Dual-monitor arm setup, high-resolution ultrawide monitor, premium noise-canceling headphones (Bose, Sony), dedicated external webcam with ring light for flawless video calls.
Well-Being Enhancements: High-end air purifier, smart lighting system (Philips Hue) programmed for circadian rhythm support, professional-grade acoustic treatment.
Key Principle:* Every element is chosen for exceptional quality, perfect fit, and deep alignment with personal values (sustainability, craftsmanship, aesthetics). This tier is about creating a deeply personalized sanctuary that supports peak performance and joy for years. It’s justified for those who spend significant hours in the space and value long-term ROI on health and productivity.
Smart Spending Strategies Regardless of Budget:
The 24-Hour Rule: Wait 24 hours before purchasing any non-essential item. Does the need persist? Often, the urge passes, or a better solution emerges.
Buy Used, Sell Unused: Platforms like Facebook Marketplace, OfferUp, and eBay are goldmines for quality office furniture. Conversely, sell items you no longer need to fund upgrades.
Prioritize the “Big Rocks”: Allocate budget first to Chair > Desk Surface > Monitor Positioning > Lighting. These impact health and core function most. Decor and secondary storage come later.
DIY Where Skills Allow: Building a simple floating shelf desk, painting old furniture, or creating fabric-covered bulletin boards can save money and add personal satisfaction. Only DIY if you have the tools and skills to do it safely and well.
Phase Your Purchases:* You don’t need everything day one. Start with Foundation Tier fixes. Save for one Optimized Tier upgrade per month. This builds momentum and ensures each purchase is intentional.
Navigating Common Pitfalls: Mistakes Even Smart Planners Make
Awareness of these frequent errors can save you significant time, money, and frustration. These are distilled from recurring patterns observed in workspace setups.
Pitfall 1: Ignoring the “Human Factor” in Multi-Use Spaces
The Mistake: Designing the perfect desk layout without discussing it with household members. Placing the desk in a high-traffic path, blocking a closet door, or creating a visual eyesore in a shared living area.
The Consequence: Resentment, constant interruptions, arguments, and ultimately abandoning the setup. The space becomes a source of household tension.
The Antidote: Involve others during the Survey phase*. Show them your sketch. Ask: “How would this placement affect your use of the room?” “What concerns do you have?” Incorporate their feedback. Establish clear communication protocols (signals, shared calendar). Remember: Your office is a guest in the shared space. Design with empathy and respect. A slightly less optimal desk position that maintains household harmony is vastly superior to a “perfect” setup that causes conflict.
Pitfall 2: Over-Prioritizing Aesthetics Over Ergonomics
The Mistake: Choosing a beautiful, minimalist desk that is too high, paired with a stylish but unsupportive chair, because it “looks good.” Ignoring monitor height because the laptop stand “clashes with the decor.”
The Consequence: Chronic discomfort (neck, back, wrists), eye strain, fatigue, and decreased productivity. The beautiful space becomes associated with discomfort, leading to avoidance. Health costs far outweigh any aesthetic benefit.
The Antidote: Ergonomics is the non-negotiable foundation. Then layer aesthetics on top. A monitor arm can be painted to match your wall. Cable management creates visual cleanliness that enhances aesthetics. Choose ergonomic accessories in colors that complement your scheme (many chair manufacturers offer fabric/color options). Remember: A space that feels* good to use is inherently more beautiful than one that merely looks good in a photo but causes discomfort. Your well-being is the highest priority.
Pitfall 3: The “Clutter Creep” of Good Intentions
The Mistake: Starting with a beautifully organized desk, then gradually adding “just one more” notebook, a new plant, a souvenir from a trip, until the surface is chaotic. Keeping items “just in case” you might need them someday.
The Consequence: Visual overload increases cognitive load and stress. Finding items becomes time-consuming. The space feels chaotic and unprofessional (especially on video calls). The initial joy of the space diminishes.
The Antidote: Implement the “One In, One Out” rule rigorously. Schedule the Weekly 10-Minute Tune-Up specifically to combat clutter creep. Define your “Reset State” photograph and use it as a benchmark. Ask ruthlessly of every item: “Does this serve a current, active purpose in my work today*?” If not, it belongs in storage or should be discarded. Embrace minimalism on the desk surface—only daily essentials. Use containers to hide necessary clutter. Remember: Empty space on your desk is not wasted space; it’s breathing room for your mind.
Pitfall 4: Underestimating Power and Cable Needs
The Mistake: Placing the desk far from the only available outlet, leading to a hazardous tangle of extension cords across the floor. Not accounting for the number of devices needing power (laptop, monitor, lamp, phone charger, headset).
The Consequence: Tripping hazard, potential fire risk (if using undersized extension cords), constant frustration of unplugging devices to charge others, visual mess, and potential damage to cords from being pinched under furniture.
The Antidote: The Survey phase must include precise outlet mapping. Plan your power solution before* finalizing desk placement. Invest in a quality under-desk power hub with sufficient outlets and USB ports. Use cord covers for any necessary floor runs. If outlets are critically insufficient, consult a qualified electrician about adding a dedicated outlet (a worthwhile investment for a permanent workspace). Never daisy-chain multiple extension cords or power strips, as this can overload circuits. When in doubt about electrical safety, seek professional guidance.
Your Questions, Answered
Q: How small can a functional home office realistically be?
A: A highly functional micro office can thrive in spaces as compact as a converted closet (minimum 24″ deep × 36″ wide) or a dedicated corner nook. Success hinges not on square footage but on intentional configuration: precise measurements during the Survey phase, vertical storage solutions, multi-functional furniture, and ruthless curation of what resides in your immediate workspace (Zone 1). Focus on creating an ergonomic “work envelope” where essential tools are within comfortable reach.
Q: Is a closet really a viable office space? What are the non-negotiables?
A: Yes, a closet can be an excellent office solution, particularly for visual separation in bedrooms or hallways. Non-negotiables include: adequate lighting (battery-operated LED puck lights or a low-voltage strip),